Get your club ready to play
What you set up once at the start of the season so that anyone can run the scoreboard afterwards without touching a thing: categories, pitches, users, the look of the screen, ads and family consents.
1Who this guide is for
For the club administrator: the person who gets everything ready so that, on any match day, anyone can run the scoreboard without setting anything up. Almost all of it is done once, at the start of the season, and rarely touched again.
Everything is in the menu. On a phone, tap the three-line button at the top right. On a computer, the main sections also appear as tabs in the top bar.
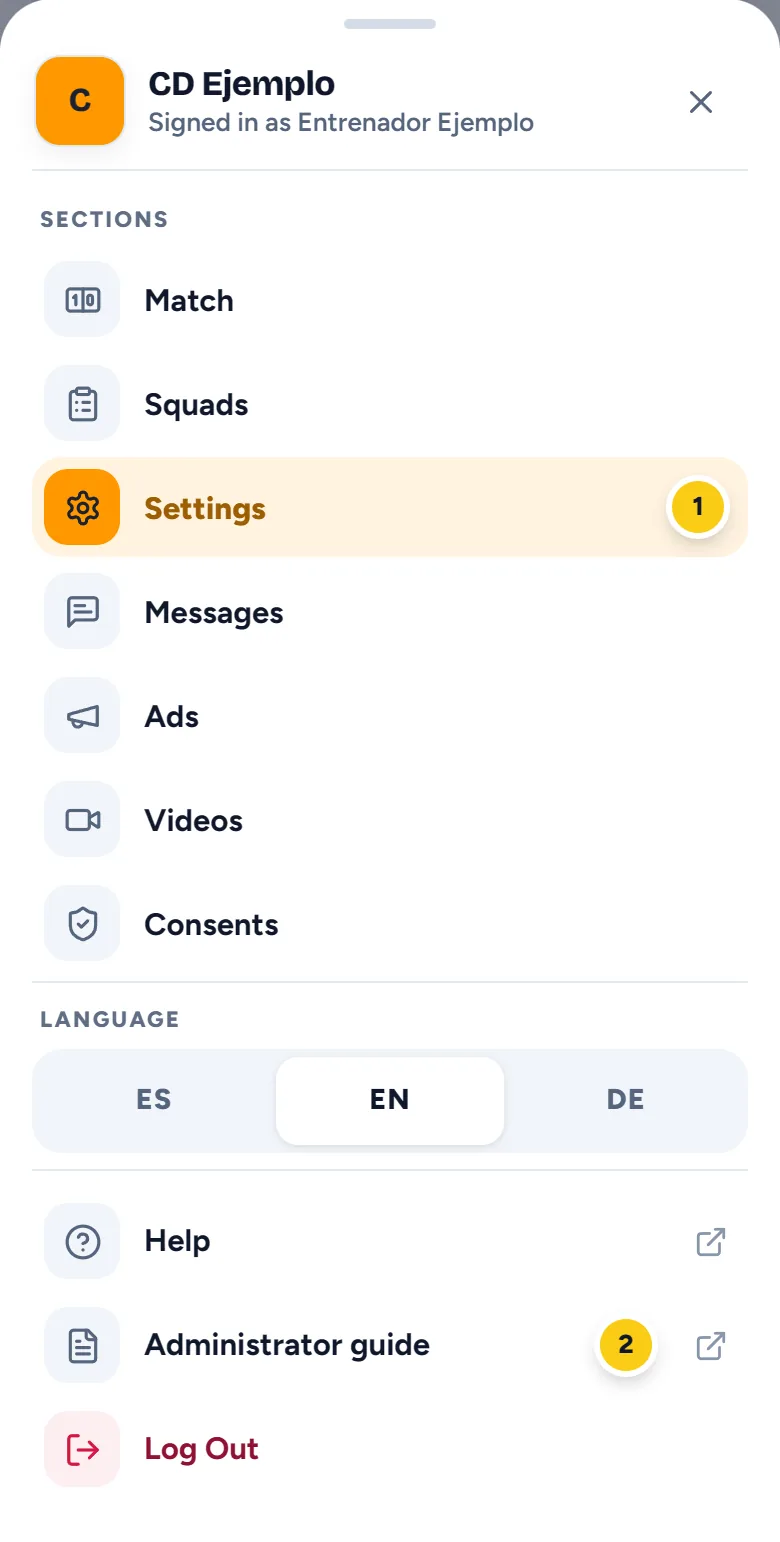
- Settings: categories, pitches, users, the look of the scoreboard, crests, animations and integrations. This is where you'll spend most of your time.
- Administrator guide: this guide. It opens in a new tab, just like Help, the guide for running a match.
Settings, Messages, Ads, Consents (if your club uses them) and this guide. Squads and Videos appear for every user once they are switched on. If you can't see these options, ask another administrator to give you the permission (see Users).
Recording goals, cards and substitutions, the clock or presenting the team is in the user guide (Help in the menu).
2Where to start
If you're setting up the club for the first time, follow this order: each step builds on the one before, so you won't have to go back.
- Categories: first of all, because they set how long each period lasts.
- Pitches: the places where matches are played.
- Users: who will be able to run the scoreboard.
- Scoreboard: the default name, the colours, the club logo and crest.
- Crests: check your opponents' crests are there and request any that are missing.
- Squads: switch them on and create the teams with their players and photos.
- Animations: goals, cards and substitutions.
- Ads: your sponsors.
- Integrations: only if the pitch screen is connected to the system.
It's the step people forget most, and the one that causes most trouble later: without a category you can't set up a match.
3How Settings works
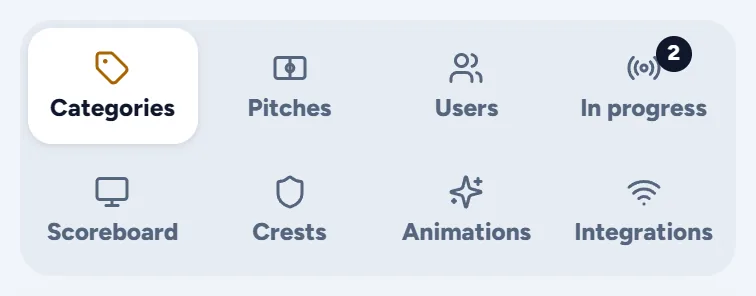
The screen is split into tabs: Categories Pitches Users In progress Scoreboard Crests Animations Integrations. Tap one and its content appears below.
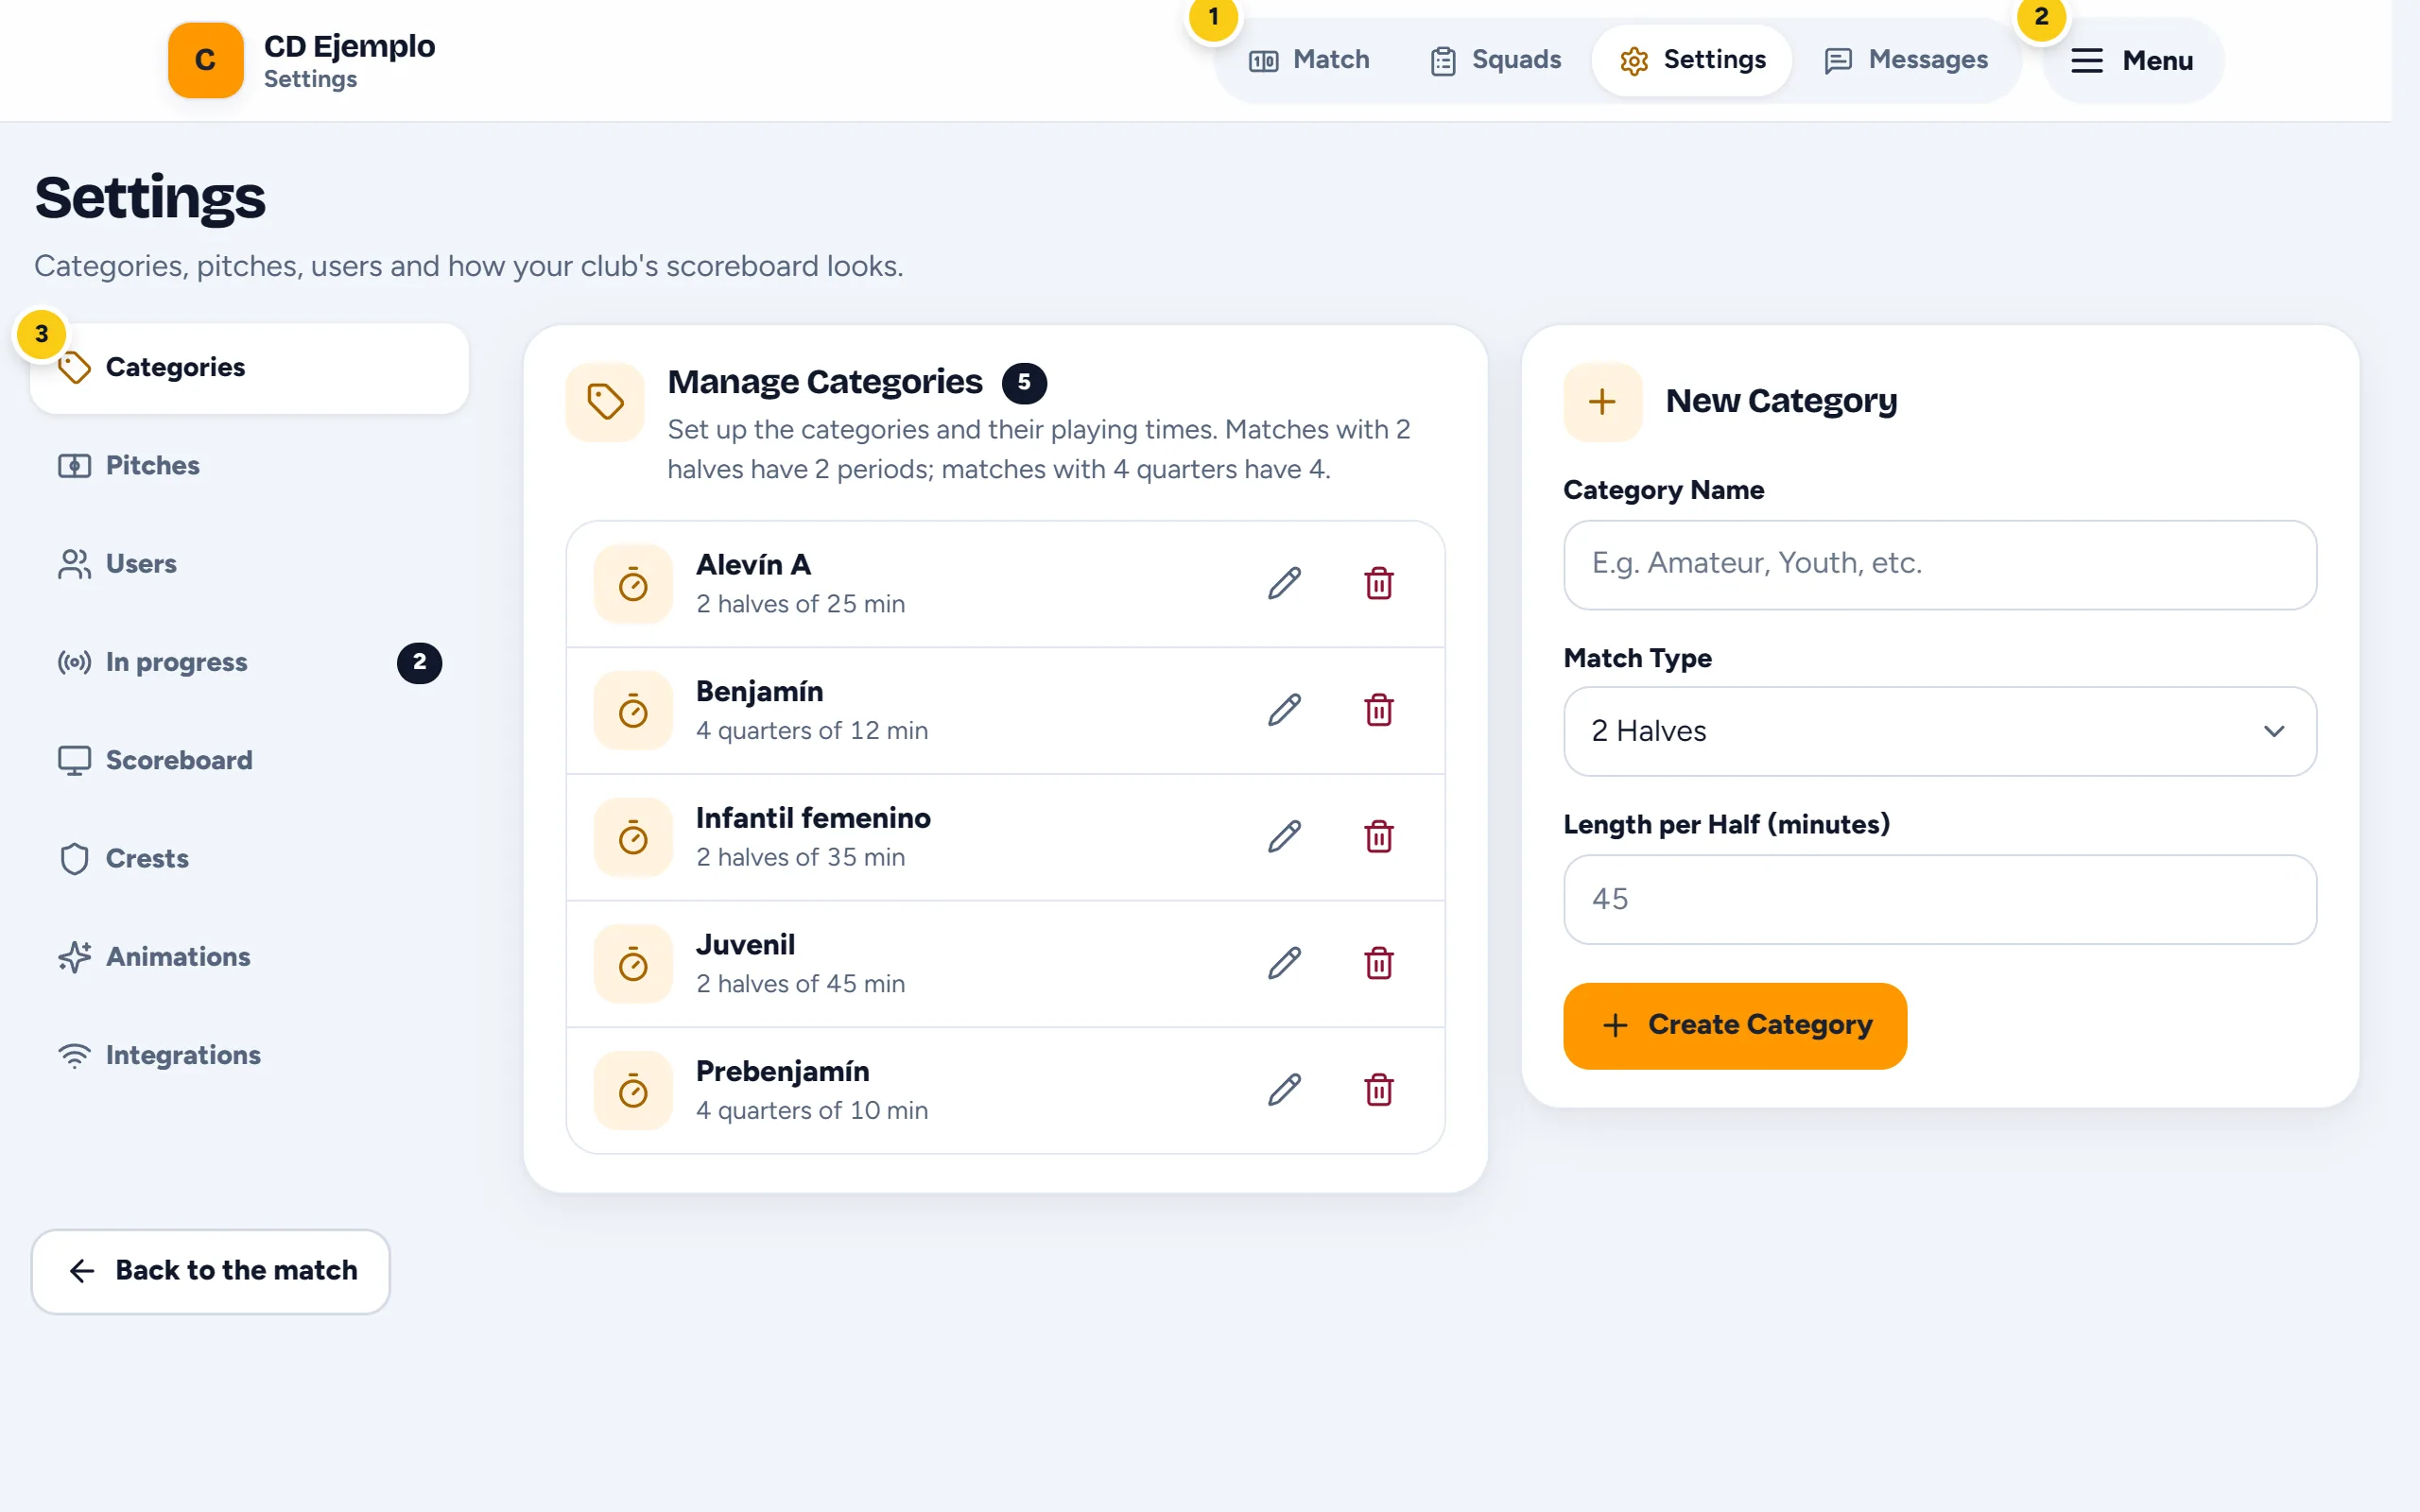
- The main sections of the app: Match, Squads, Settings and Messages.
- Menu: the other sections (Ads, Videos, Consents), the language and the guides.
- The Settings tabs. The number on In progress tells you how many matches are open right now.
The screen remembers the last tab you opened: when you come back, you carry on where you left off.
Three ways of saving
- With a button. The Scoreboard and Animations cards save everything together when you press their button: Save Settings and Save Animation Settings. Videos, Tuya and Suricato also have their own save button.
- Instantly. Some switches are saved as soon as you tap them. It says so underneath: “Saved instantly, no button needed.” These are the crests switch, the squads switch and each user's administrator switch.
- Images (the logo, the club crest and the cards) are uploaded with their own button, without waiting to save: “It is uploaded as soon as you press the button; no need to save.”
When something is saved, the page reloads and a green notice appears at the top, for example “Category created successfully”.
The unsaved changes notice
On cards with a button, the app reminds you as soon as you change something:
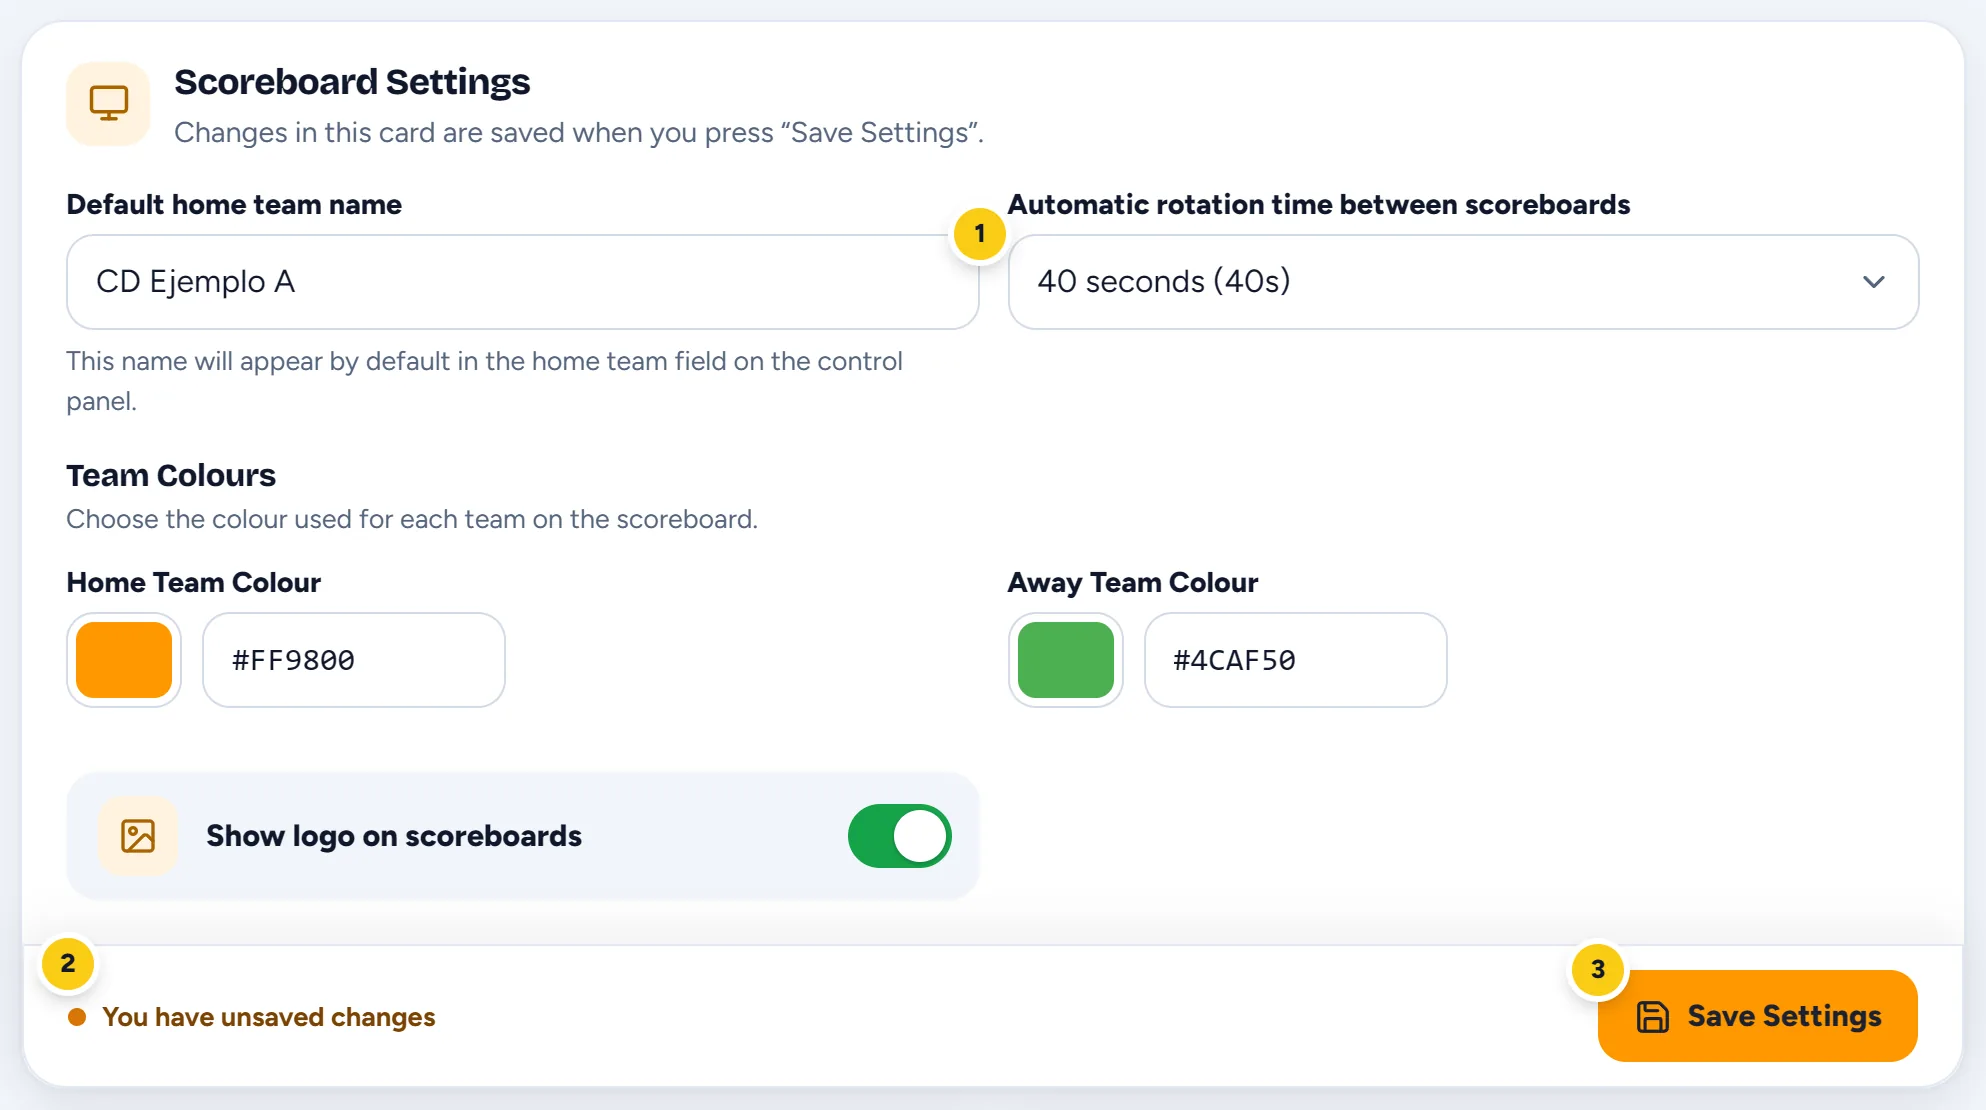
- You change a field, a colour or a switch.
- “You have unsaved changes” appears at the bottom, with an orange dot.
- Press the save button and the notice goes away.
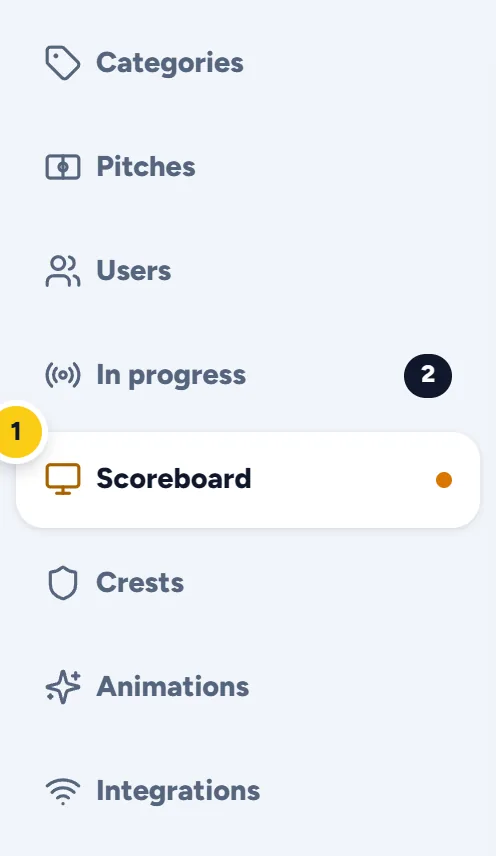
Whatever you changed stays there, but it doesn't count until you press the button. If you try to leave the page with pending changes, the browser asks you first.
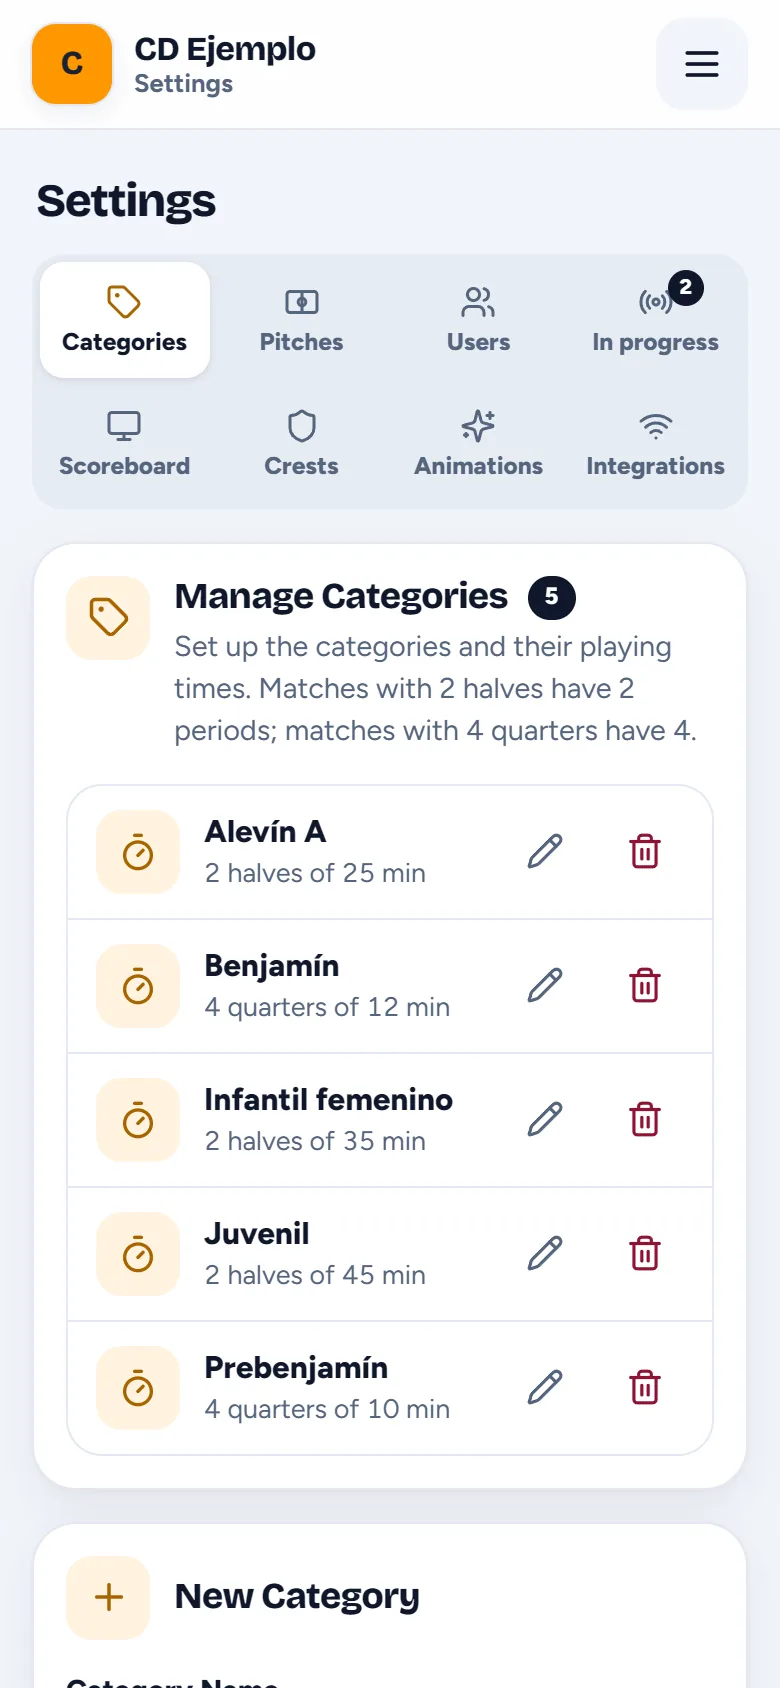
4Categories
A category is an age group with its own timing rules: Under-8, Under-10, Under-12… or whatever your club calls them. It's what tells the clock when each period ends.
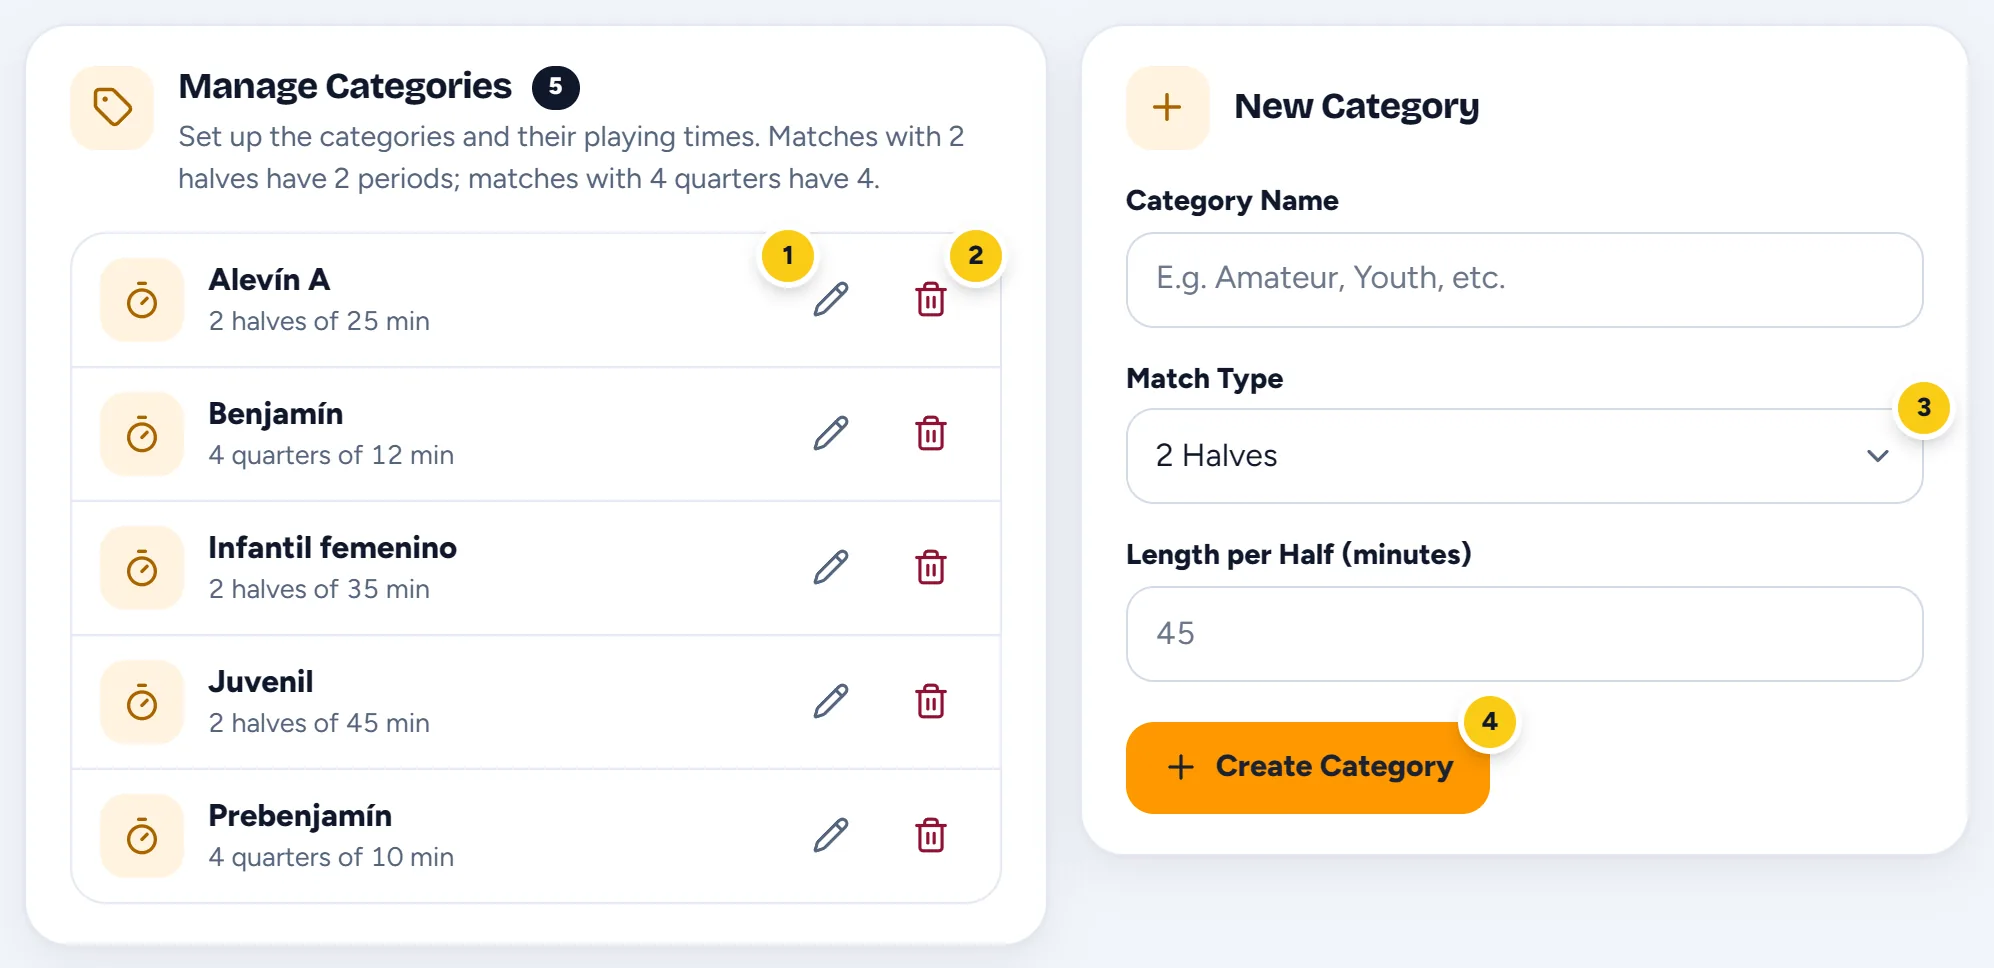
- Edit (the pencil): change the name, the type or the length.
- Delete (the bin): asks for confirmation first.
- Match Type: 2 Halves or 4 Quarters. Depending on your choice, it then asks for the Length per Half or the Length per Quarter, in minutes.
- Create Category: it's added to the list, which sums it up like this: “2 halves of 25 min”.
If you delete a category that matches or squads already use, they're left without one and you'll have to assign another. To change the length, edit it.
5Pitches
Pitches are the places where you play: Pitch 1, 7-a-side, Indoor court… A name is all you need: type it in New Pitch, leave Pitch active ticked and press Create Pitch.
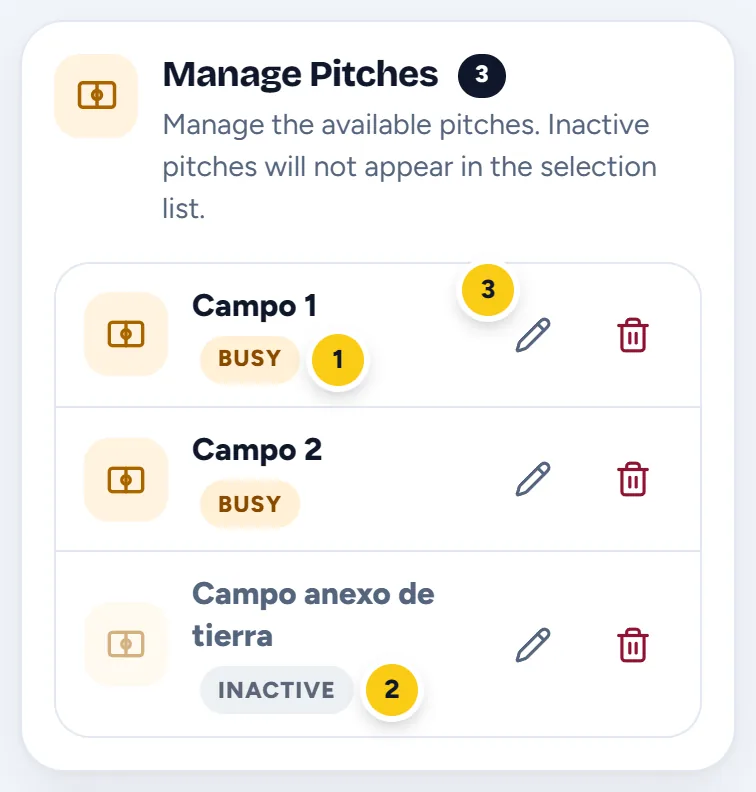
- Busy: there's an open match on that pitch.
- Inactive: it doesn't appear in the list when setting up a match. Useful for keeping a pitch you're not using this season, without deleting it.
- Edit: change the name or switch the pitch on and off.
While a match has a pitch and hasn't been ended, that pitch shows as Busy and nobody else can use it. It's the classic match-day phone call, and you fix it in Matches in progress.
Create one pitch for each real place. The screen will rotate through the matches being played; how long each one shows is set in the look of the scoreboard.
6Users
Everyone who is going to run the scoreboard needs their own login. In New User you fill in:
- Email (Username): this is what they sign in with.
- Full Name.
- Password: at least 4 characters. An easy-to-remember phrase is better than a string of random letters.
- Administrator: tick it only if they also need to configure the club.
Then press Create User. The Manage Users list shows everyone:
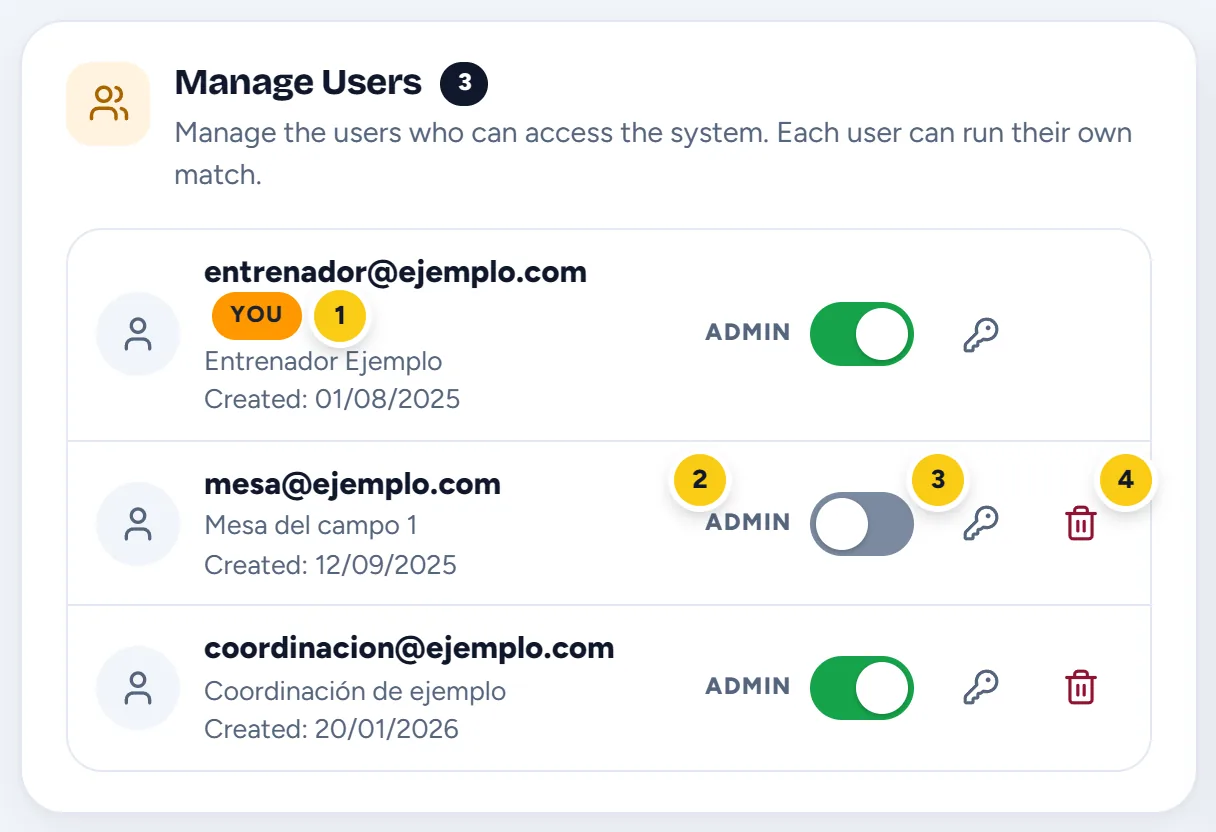
- YOU: your own account.
- Admin: gives or removes the administrator permission. It's saved instantly.
- The key: changes that user's password, yours included. Handy when someone forgets theirs.
- The bin: deletes the user when they leave the club. Yours doesn't appear: you can't delete yourself.
The app won't let you remove the permission from the last administrator, or from yourself. If you're stepping down, first give the permission to someone else and let them remove yours.
The end-of-period and close-the-scoreboard alerts go to the phone of whoever is running that match, and In progress shows who has each one open. With a shared user you lose both.
An administrator can change all the settings, delete categories and pitches, and delete matches. Running the scoreboard doesn't require it.
7Matches in progress
The In progress tab lists the matches open right now at the club. The number on the tab tells you how many there are without opening it.
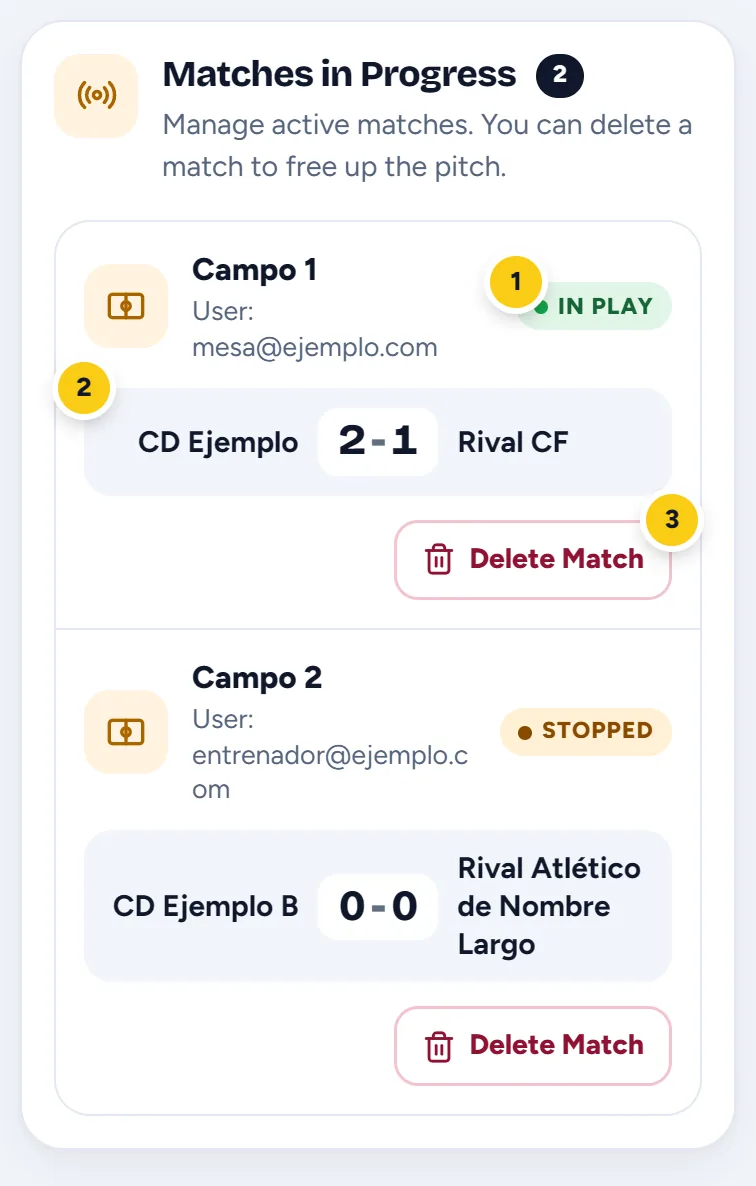
- In play if the clock is running, Stopped if it isn't. Above it, the pitch and who is running the match.
- The score right now.
- Delete Match: asks for confirmation and frees the pitch straight away.
When someone forgets to press End Match, the pitch stays blocked for the next team. From here you delete that match and the pitch is freed. Remember this tab: it's the typical match-day emergency.
A match ended from the match screen is saved with its result. One deleted from here is discarded. If the match was really played, it's better for whoever ran it to end it so it's recorded.
Matches already played
Ended matches are kept in Results, the club's public page, sorted by day, with goals, cards and substitutions. How to browse it is in the guide for families.
Back to top8The look of the scoreboard
In the Scoreboard tab you decide how the pitch screen looks.
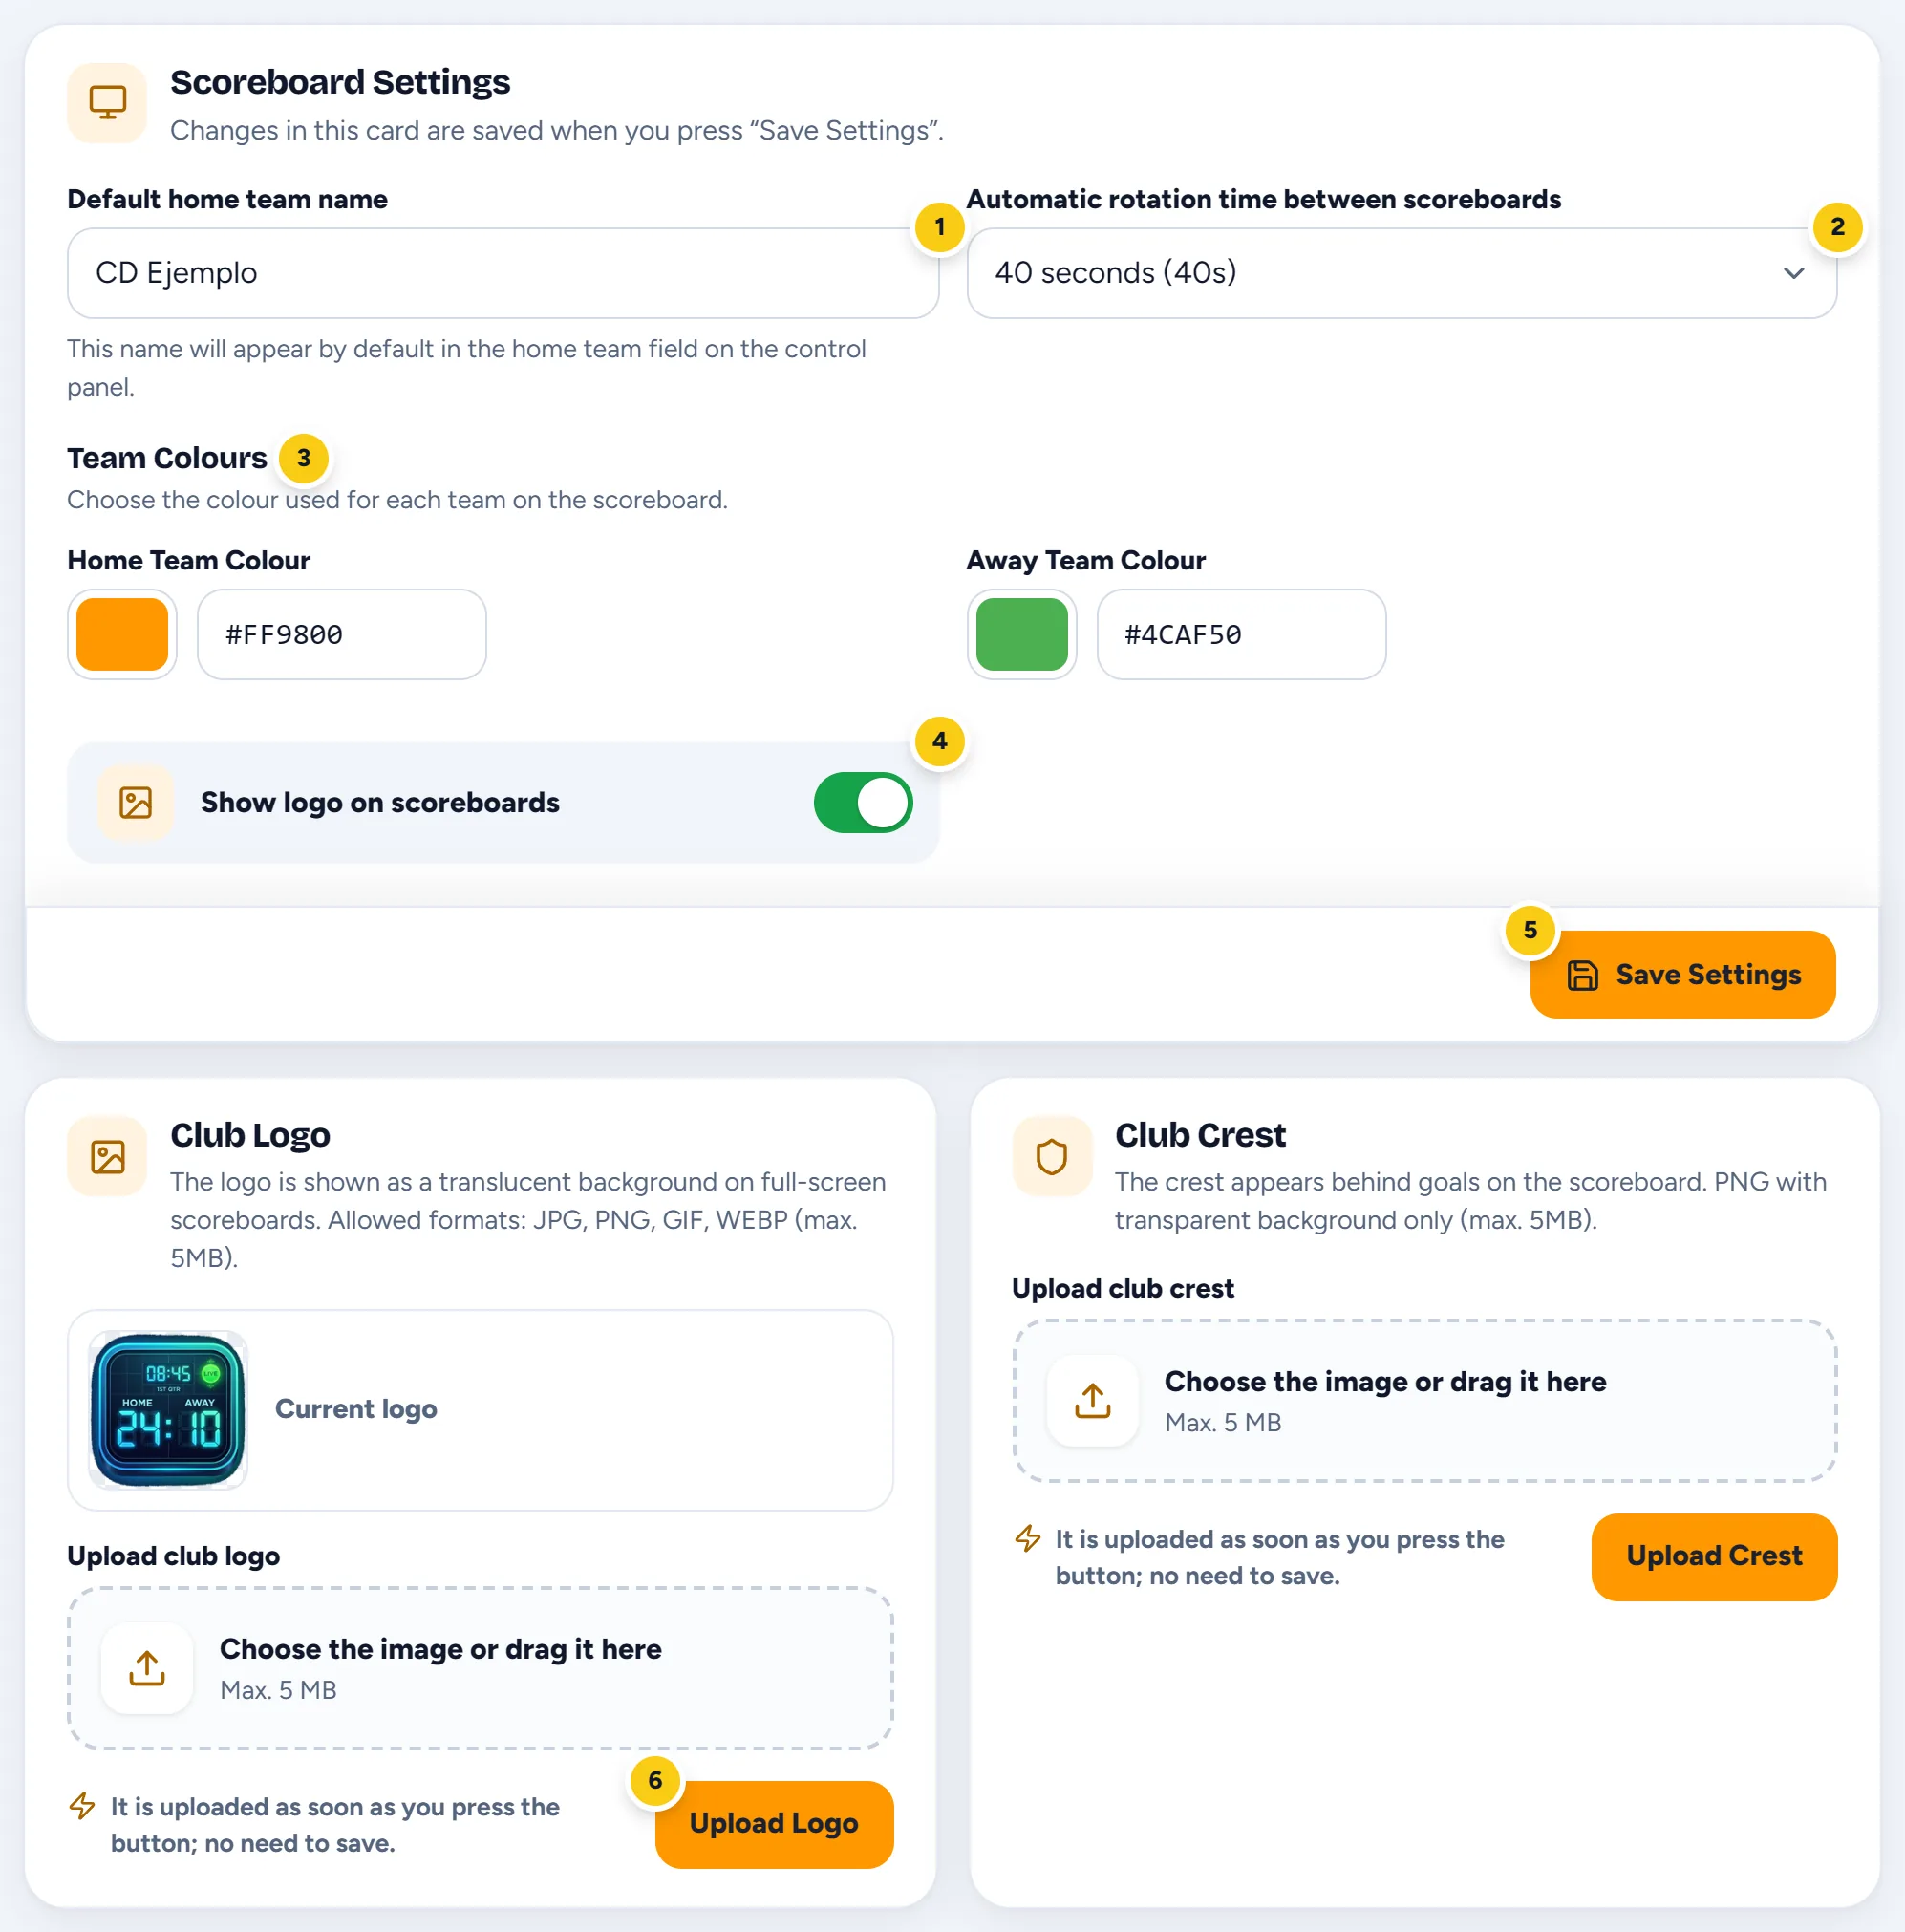
- Default home team name: already filled in when setting up a match, so nobody has to type it every time.
- Automatic rotation time between scoreboards, from 30 seconds to 2 minutes: how long each match is shown when there are several at once. With just one you won't notice.
- Team Colours: one for the home team and one for the away team. Pick it in the colour box or type the code, for example
#FF9800. - Show logo on scoreboards: puts the club logo in the background of the screen, faded.
- Save Settings: saves everything above.
- Upload Logo and Upload Crest: choose the image (or drag it in) and press the button. It's uploaded there and then.
- Club Logo: JPG, PNG, GIF or WEBP, 5 MB at most. It appears in the background of the full-screen scoreboard.
- Club Crest: PNG with a transparent background only, 5 MB at most. It appears behind the goals.
A colour that looks fine on your phone can be unreadable on the pitch screen, especially in the sun. Check it there before you settle on it.
9Opponents' crests
The crest catalogue is shared by every club and kept by the super administrator. When a match is set up, the opponent's crest appears automatically if its name matches one in the catalogue.
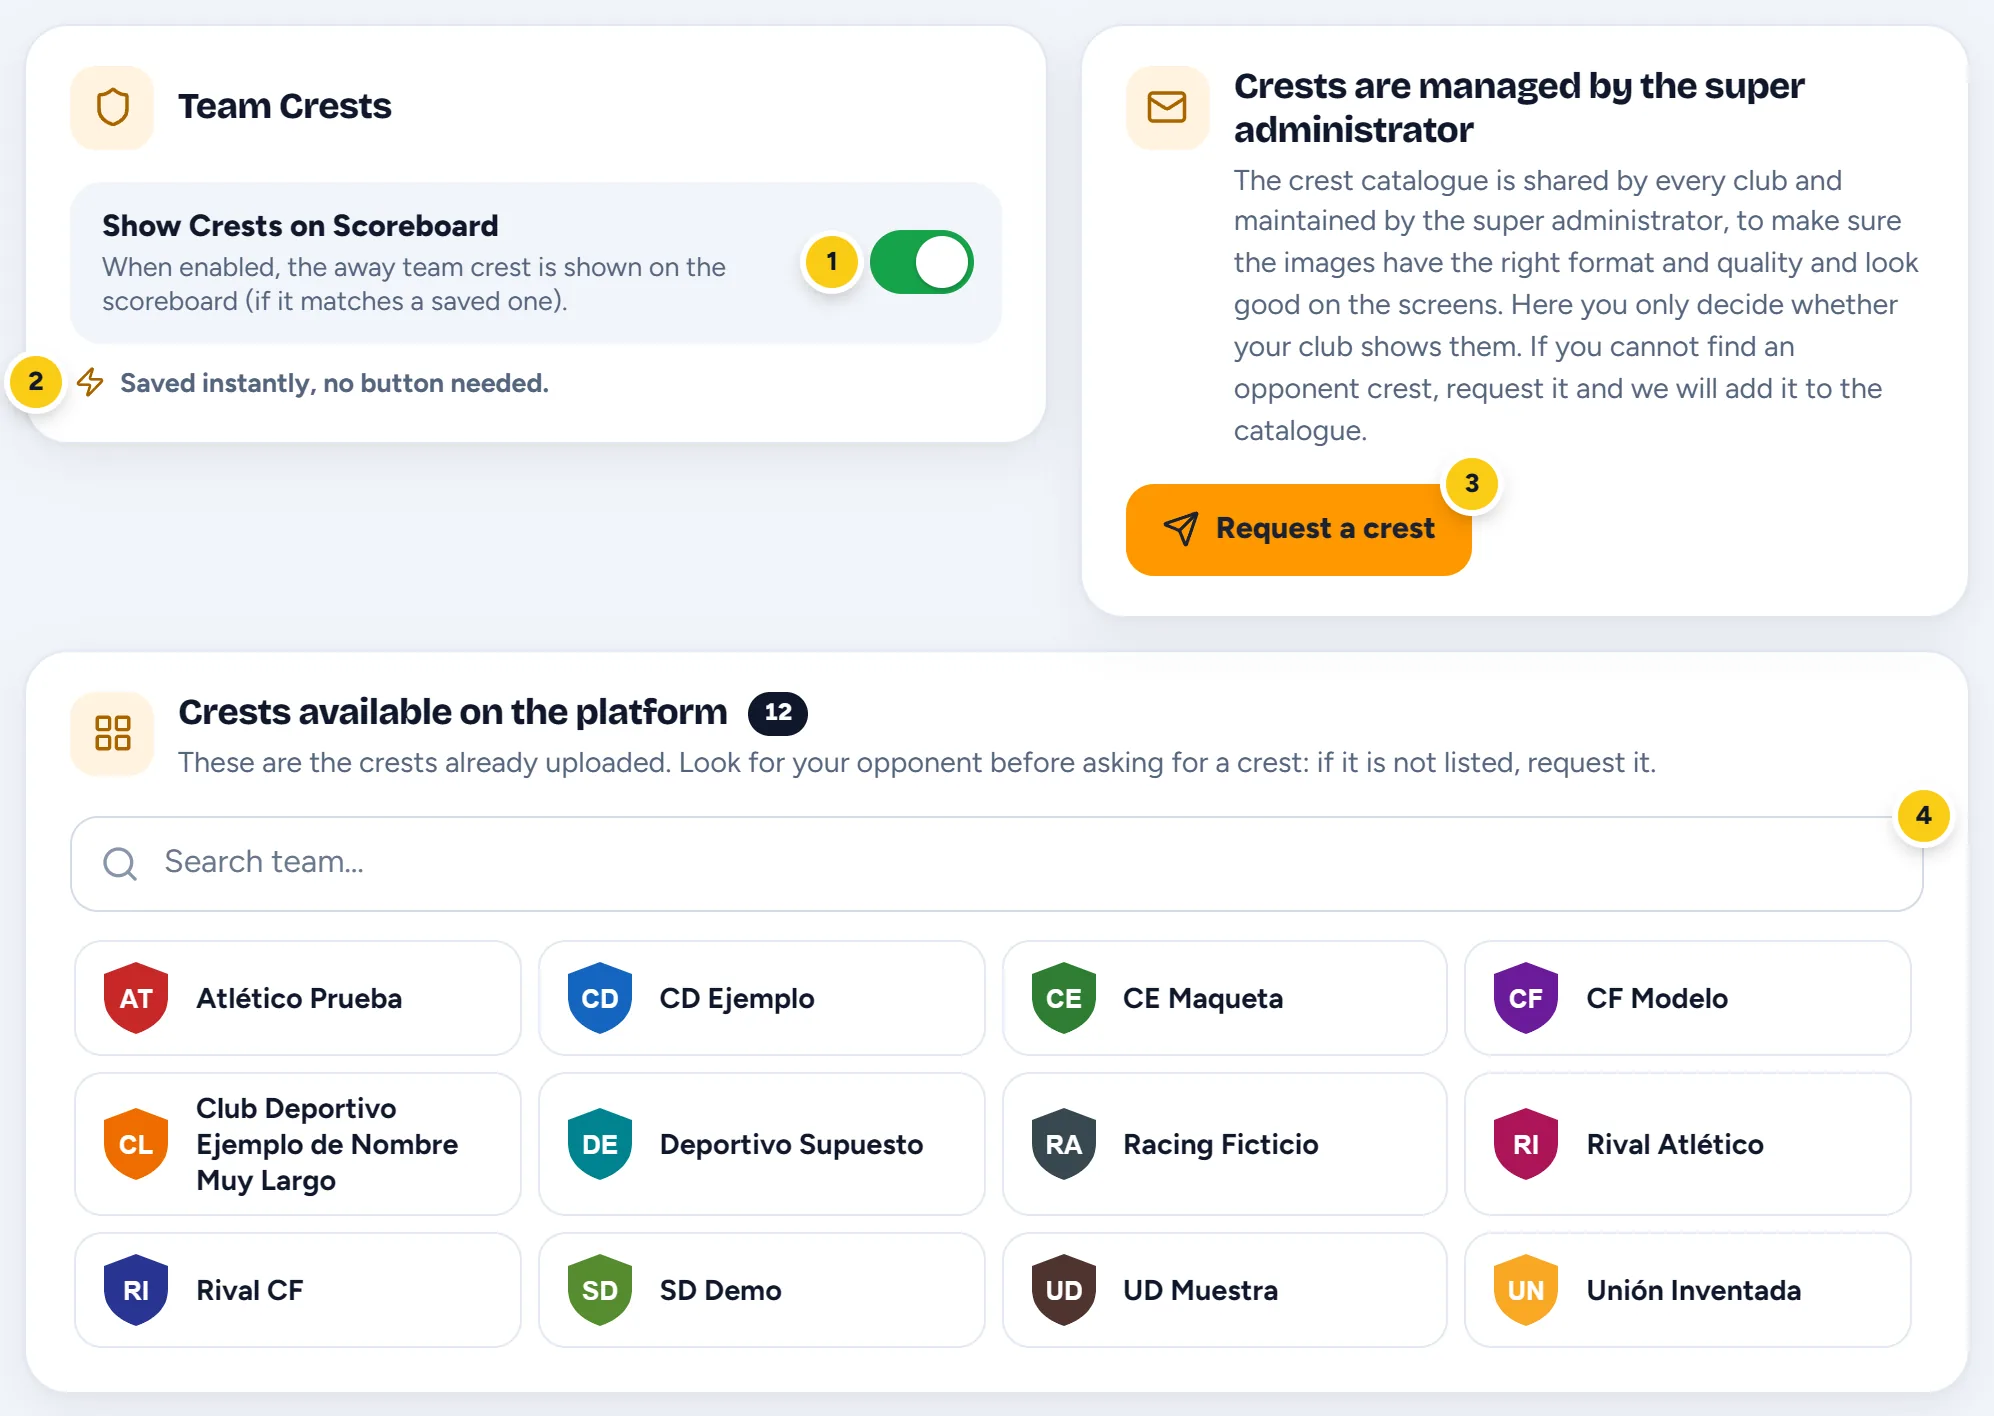
- Show Crests on Scoreboard: when it's on, the screen shows the away team's crest.
- This switch is saved instantly.
- Request a crest: ask for one that's missing.
- The search box: type part of the opponent's name and you'll see straight away whether their crest is there.
If the search finds nothing, it says “That team is not in the catalogue.” and offers Request this crest. This window opens:
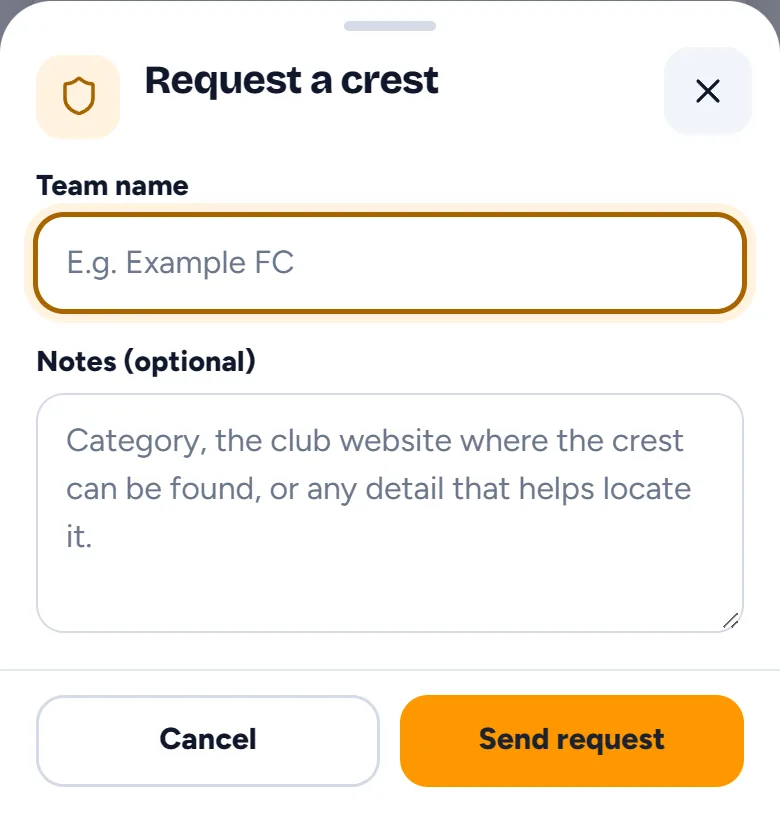
- Type the Team name exactly as you write it when setting up the match.
- In Notes, if you like, add the category or the club website where the crest can be found.
- Press Send request. We'll add it to the catalogue as soon as possible.
So the images have the right format and quality. A low-resolution crest looks bad on the pitch screen, and once it's there everyone suffers it. Request it in good time, not on match day.
10Animations
In the Animations tab you decide what the screen celebrates and how. Each animation has its own switch.
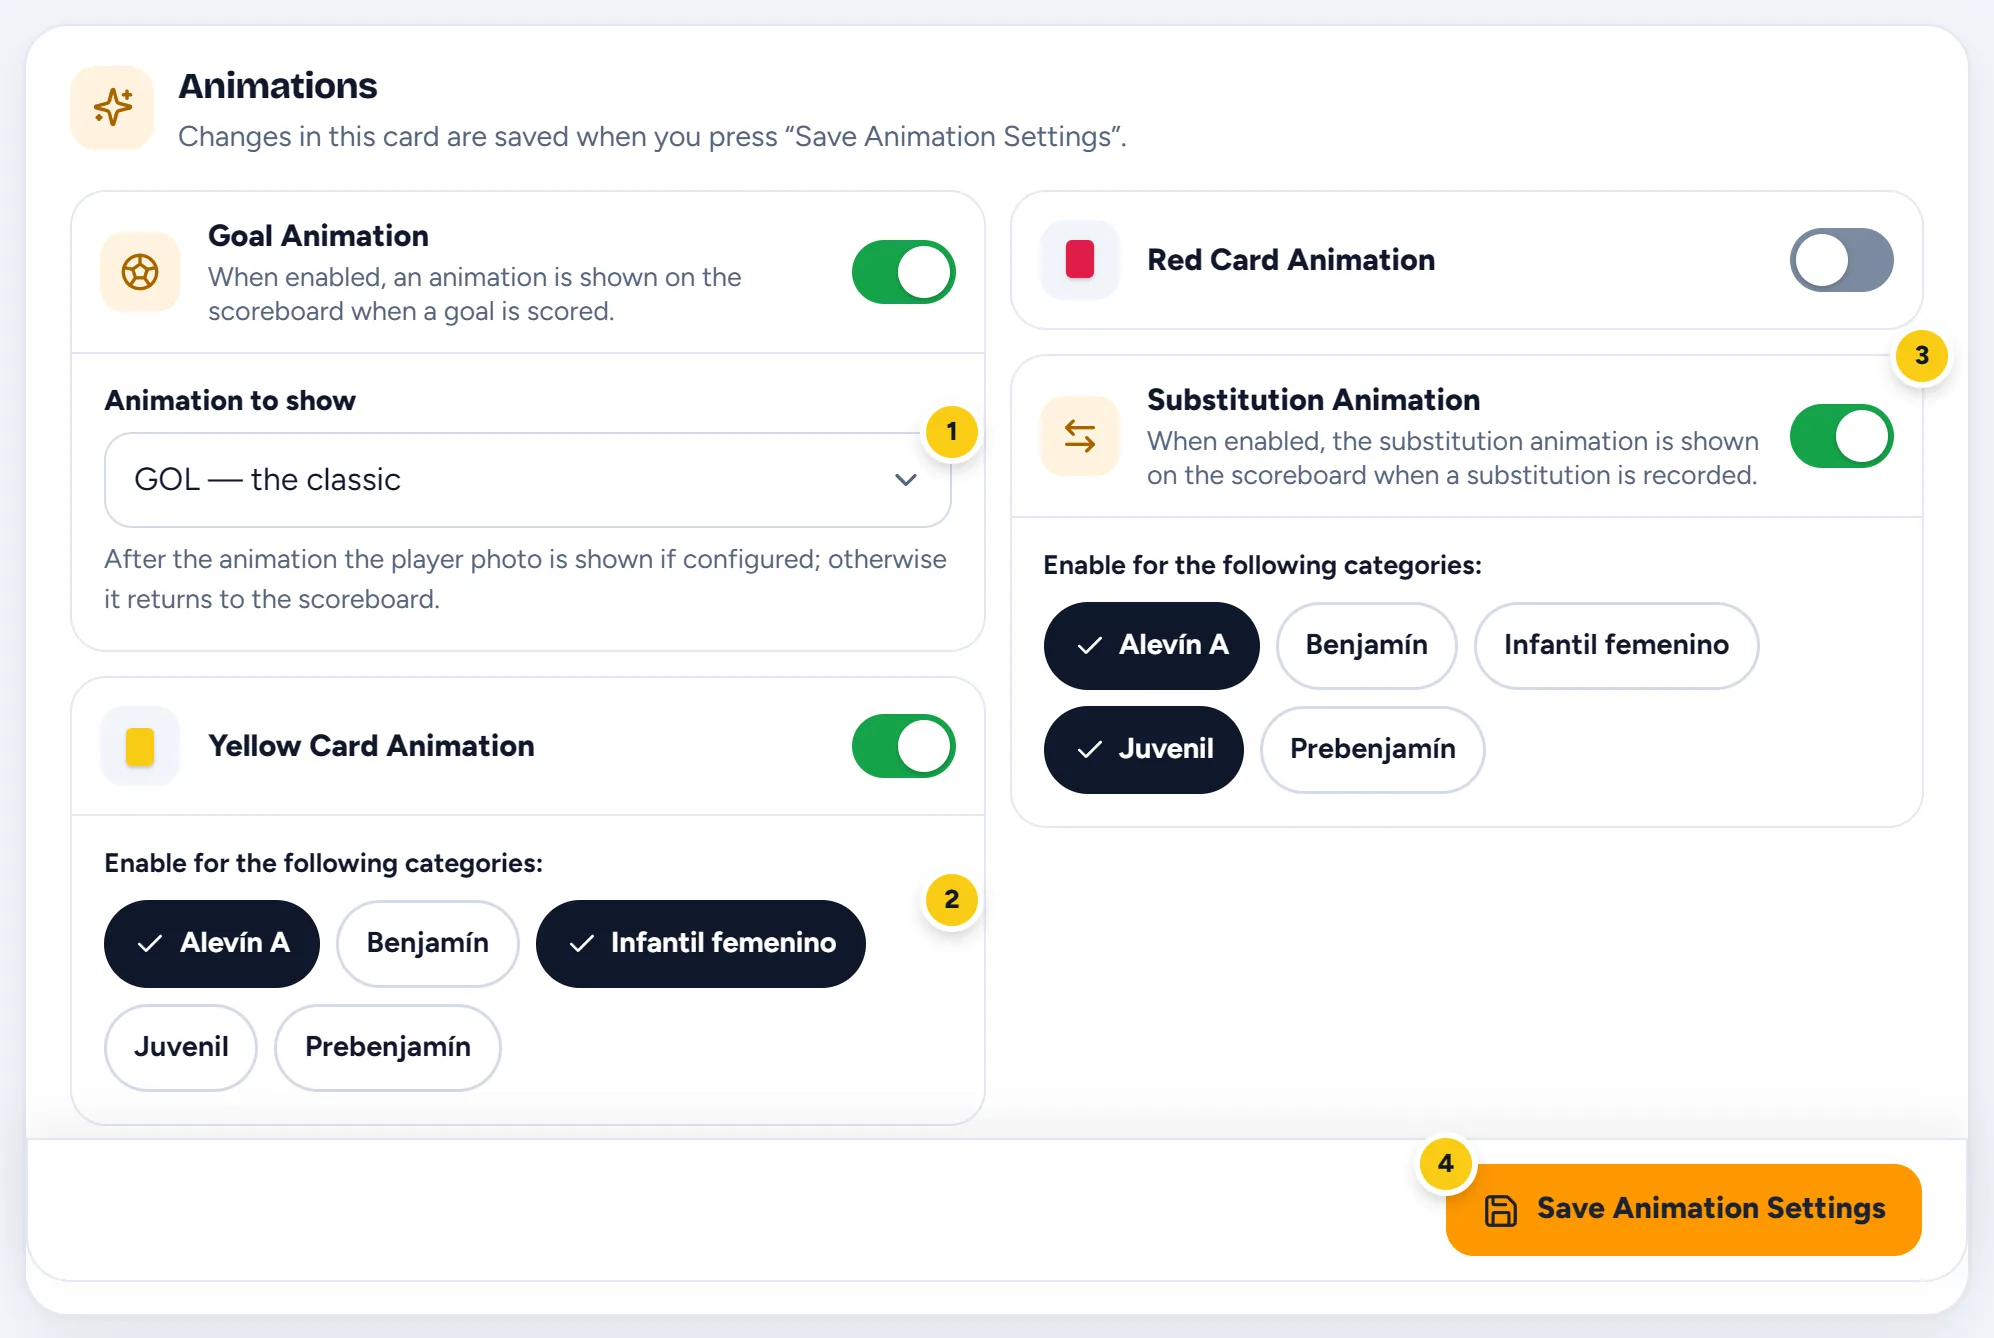
- Goal Animation and, below it, Animation to show: GOL — the classic or Leonxí — the mascot. After the animation the player's photo appears if there is one; otherwise it goes back to the scoreboard.
- Yellow and red card: when you turn the switch on, the categories appear. Tick the ones where it's used: ticked ones turn dark, with a check mark.
- Substitution Animation: who comes on and who goes off, with big shirt numbers. Also chosen by category.
- Save Animation Settings (on a phone, Save): saves the whole card at once.
Two more things are needed, both in Squads: the player must have a photo, and their team must have Show photos switched on. It's the most common slip.
Substitutions work the same way: if the substitution is for the home team, its squad shows photos and both players have one, the screen shows their photos over the club crest.
Card images
Below is Card images. As well as switching the animation on, you have to upload the image for each card: without an image, the animation doesn't appear.
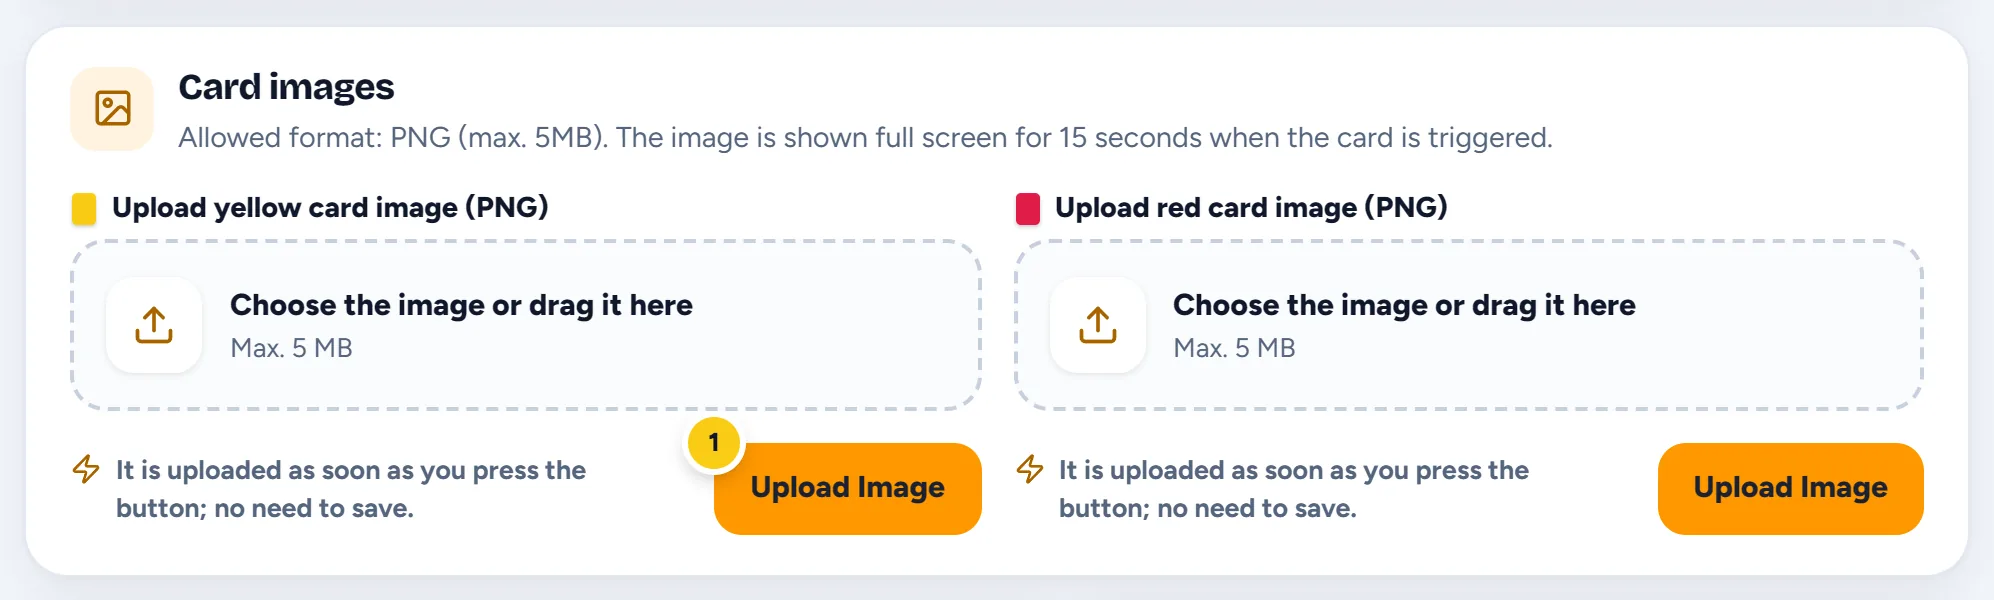
- Upload Image: uploaded straight away, without the save button above. The image is shown full screen for 15 seconds.
For the youngest players the goal animation is usually enough. Cards are hardly ever used and the screen stays cleaner.
11Squads and videos
They're switched on at the end of the Animations tab, because they also change what appears on the pitch screen.
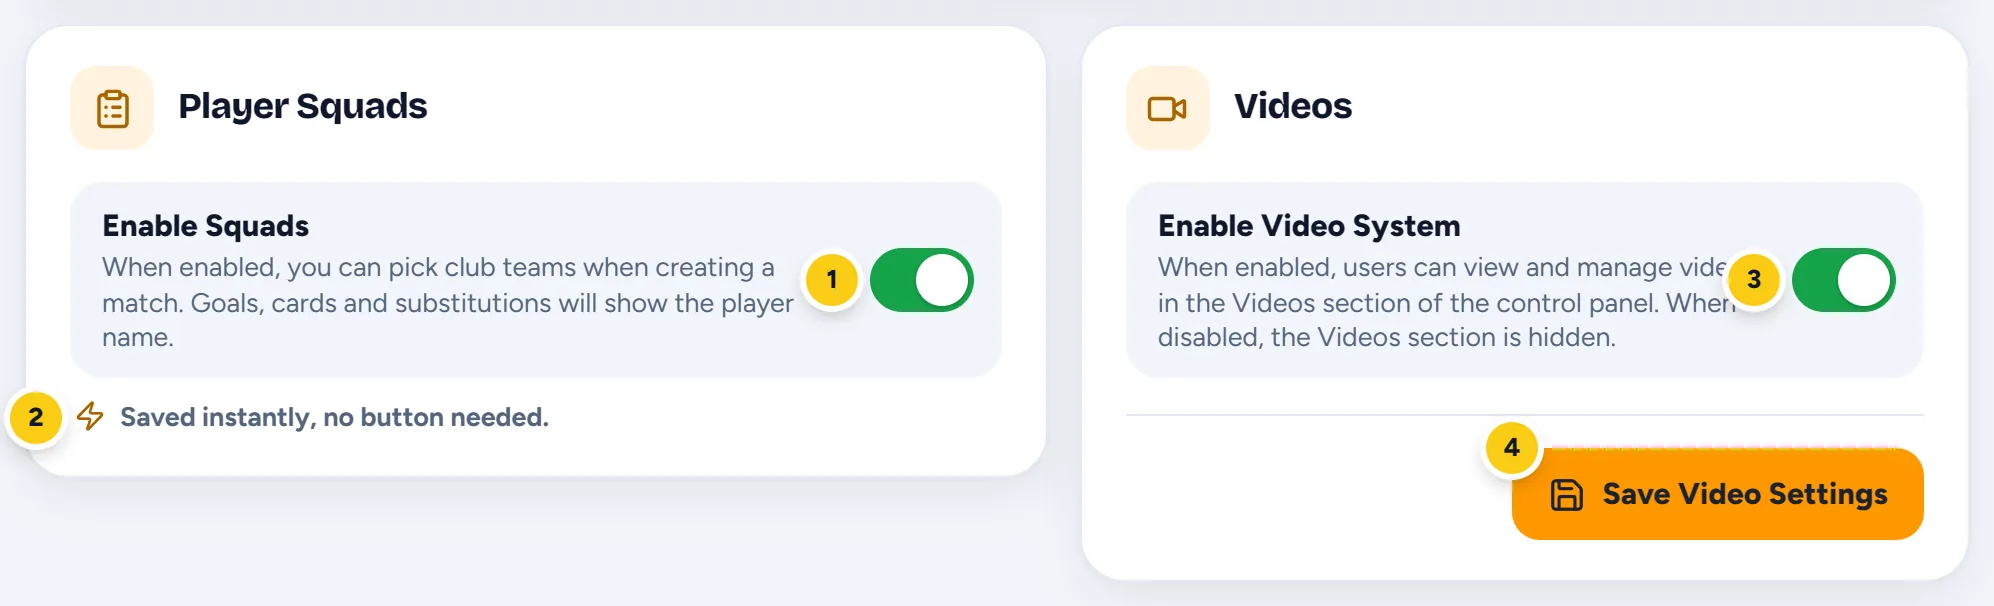
- Enable Squads.
- This switch is saved instantly.
- Enable Video System.
- This one, on the other hand, is saved with Save Video Settings.
Squads
With squads switched on, Squads appears in the menu. That's where the club's teams and their players are created, and with them you can record who scores each goal, make substitutions by tapping the players and show their photos on the screen. Each team has its own Show photos switch.
It's explained step by step in the user guide, including the difference between the line-up photo and the goal photo.
The line-up photo is cropped automatically on the coach's phone: the background is removed and it's framed like an ID photo, and the coach sees the before and after. It all happens in their browser, without sending the photo to any service; only the result reaches the server. Worth knowing when someone asks, because these are photos of children.
That's normal: the first time, their phone downloads what it needs for cropping (it says “Preparing… (first time only)”) and keeps it. After that, each photo is quick. The goal photo isn't cropped: it's shown with its background inside a circle.
Videos
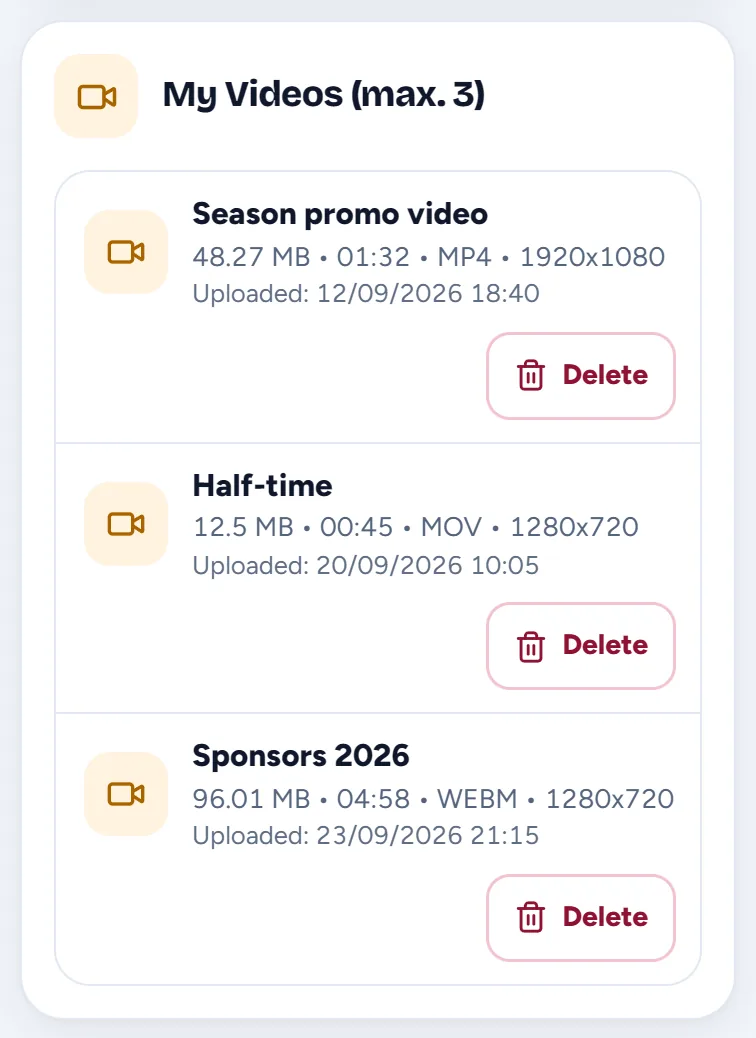
With videos switched on, Videos appears in every user's menu. Each user uploads their own and only sees the ones they uploaded: up to three per user, in MP4, WebM, MOV or AVI, 100 MB and 5 minutes at most. They're played on the screen from the match screen.
Without squads the system is a scoreboard. With squads the screen says who scored and shows their photo, and families get the alert with the name.
12Integrations
You only need these if the pitch screen is connected to the system. If not, you can skip this section.
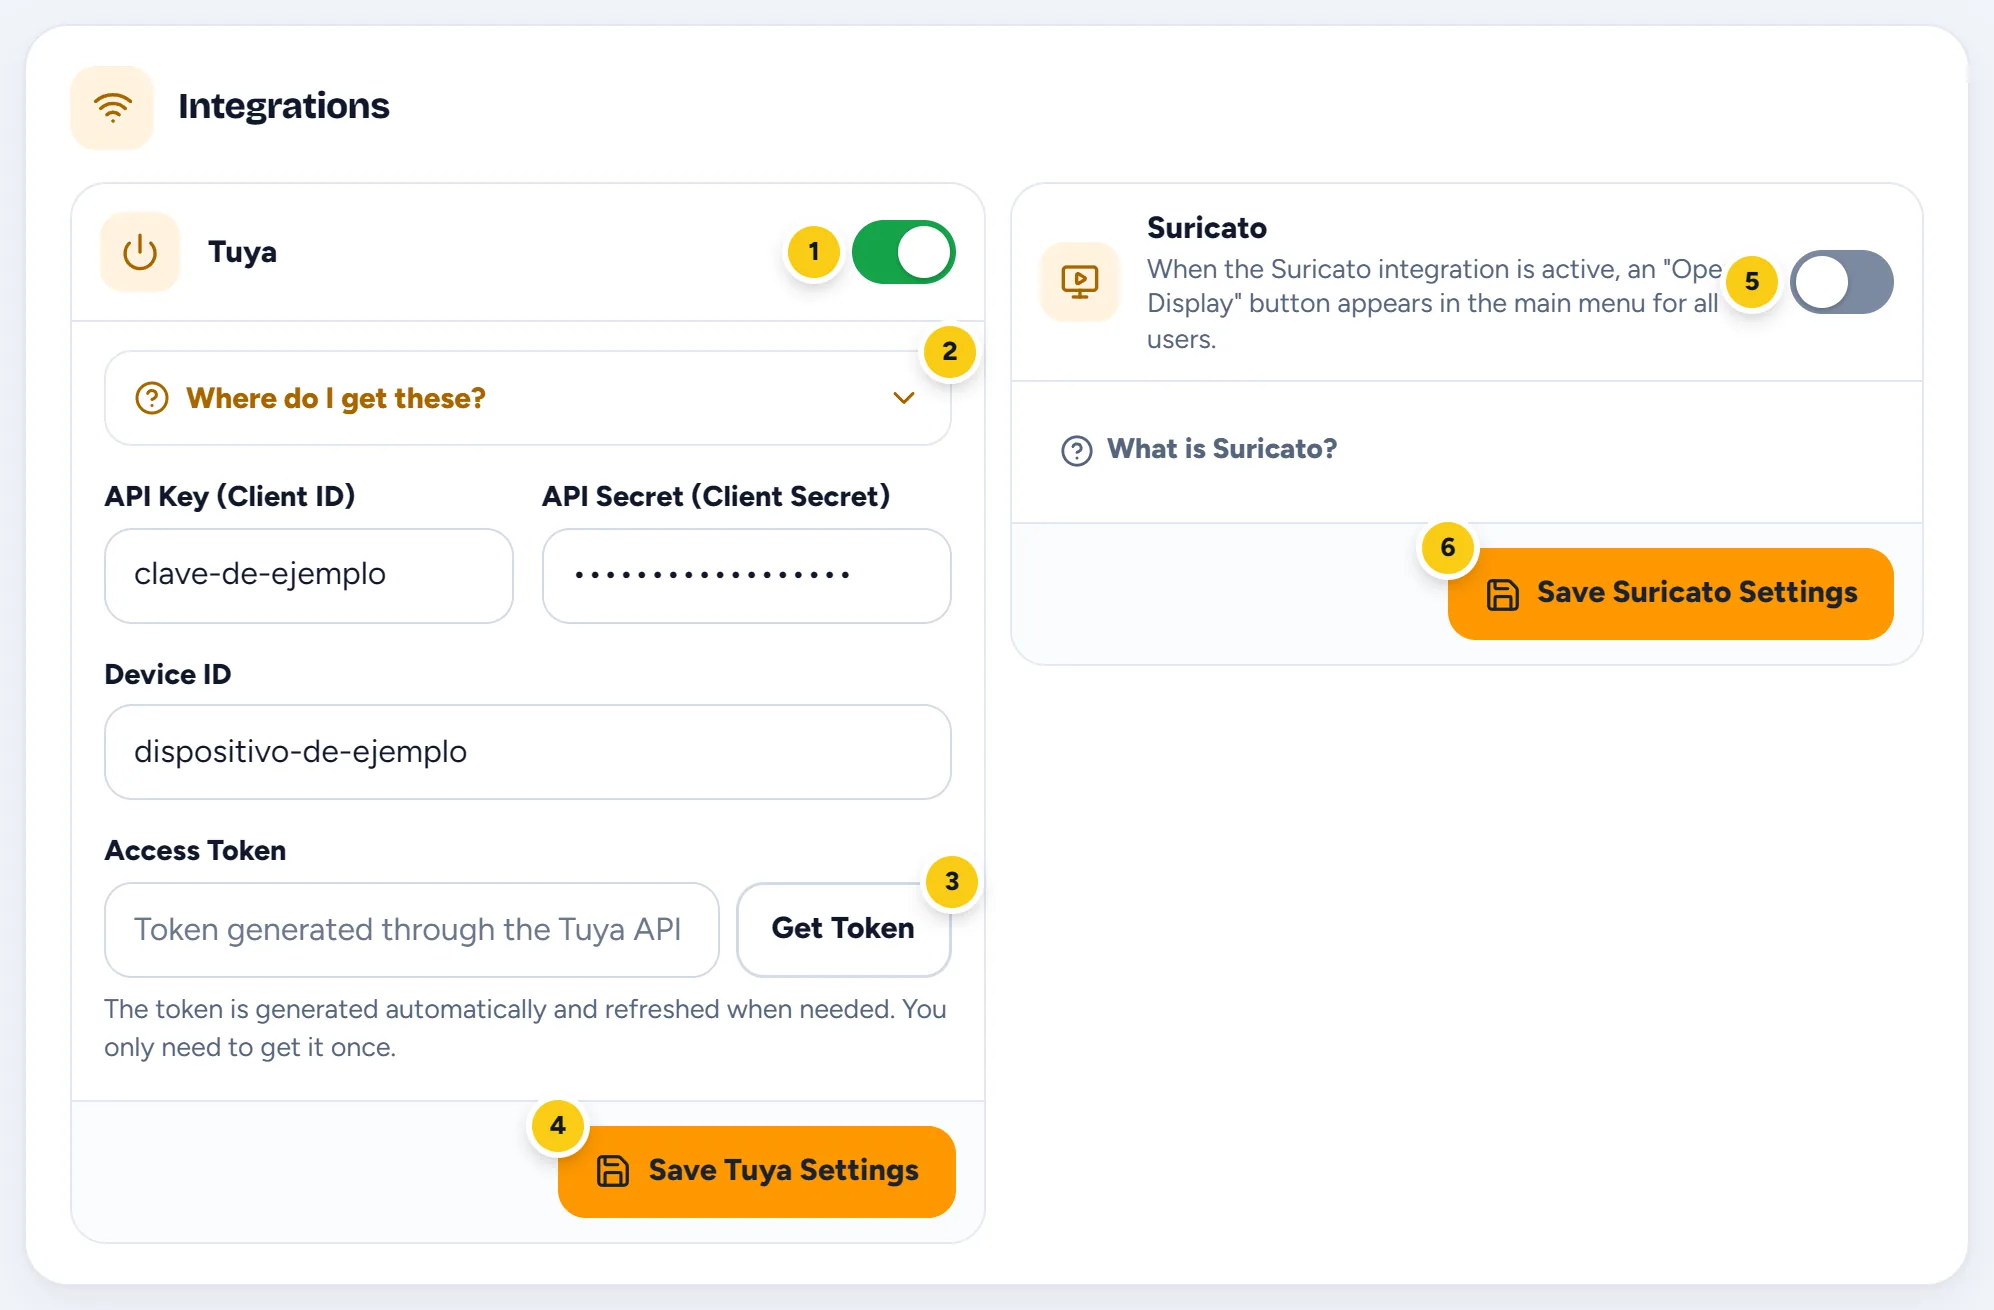
- Tuya: when you switch it on, its fields appear.
- Where do I get these?: step-by-step help, folded away.
- Get Token: generates the Access Token from the API Key and the API Secret.
- Save Tuya Settings.
- Suricato: the button for opening the scoreboard (see below).
- Save Suricato Settings.
Turning the screen on and off (Tuya)
With Tuya set up, Turn On Display appears in the menu of the match screen, and whoever is running the match can switch the screen on and off from their phone, without going to the fuse box. You need four details from the Tuya developer platform:
- API Key (Client ID) and API Secret (Client Secret): at
iot.tuya.com, create a project under Cloud; they're on its overview page. - Device ID: under Cloud → your project → Devices, after linking the Tuya Smart app account.
- Access Token: not typed by hand. Press Get Token and it's generated for you; after that it renews itself when needed.
Opening the scoreboard (Suricato)
With Suricato switched on, the menu of the match screen shows Open Display to every user. When pressed, Mimarcador, the program installed on the screen's computer, opens your club's scoreboard. It's designed for clubs that share a video scoreboard. We install and set up that program on the screen's computer ourselves: if you need it, write to us.
The notification system is shared by the whole platform, so its technical details aren't here. If your users don't receive alerts, tell the super administrator.
The Tuya keys give control over the device. Don't share them in messaging groups or leave them written down in shared places.
13Sponsor ads
They're under Ads in the menu. These are images of your sponsors that the pitch screen shows one after another and, if you like, also the live and results pages that families look at.
When no match has its clock running: before kick-off, at half-time, between matches and after the last one. If there are stopped scoreboards, the screen alternates ads and scoreboards. They never cover a match in play.
Switching on and adjusting
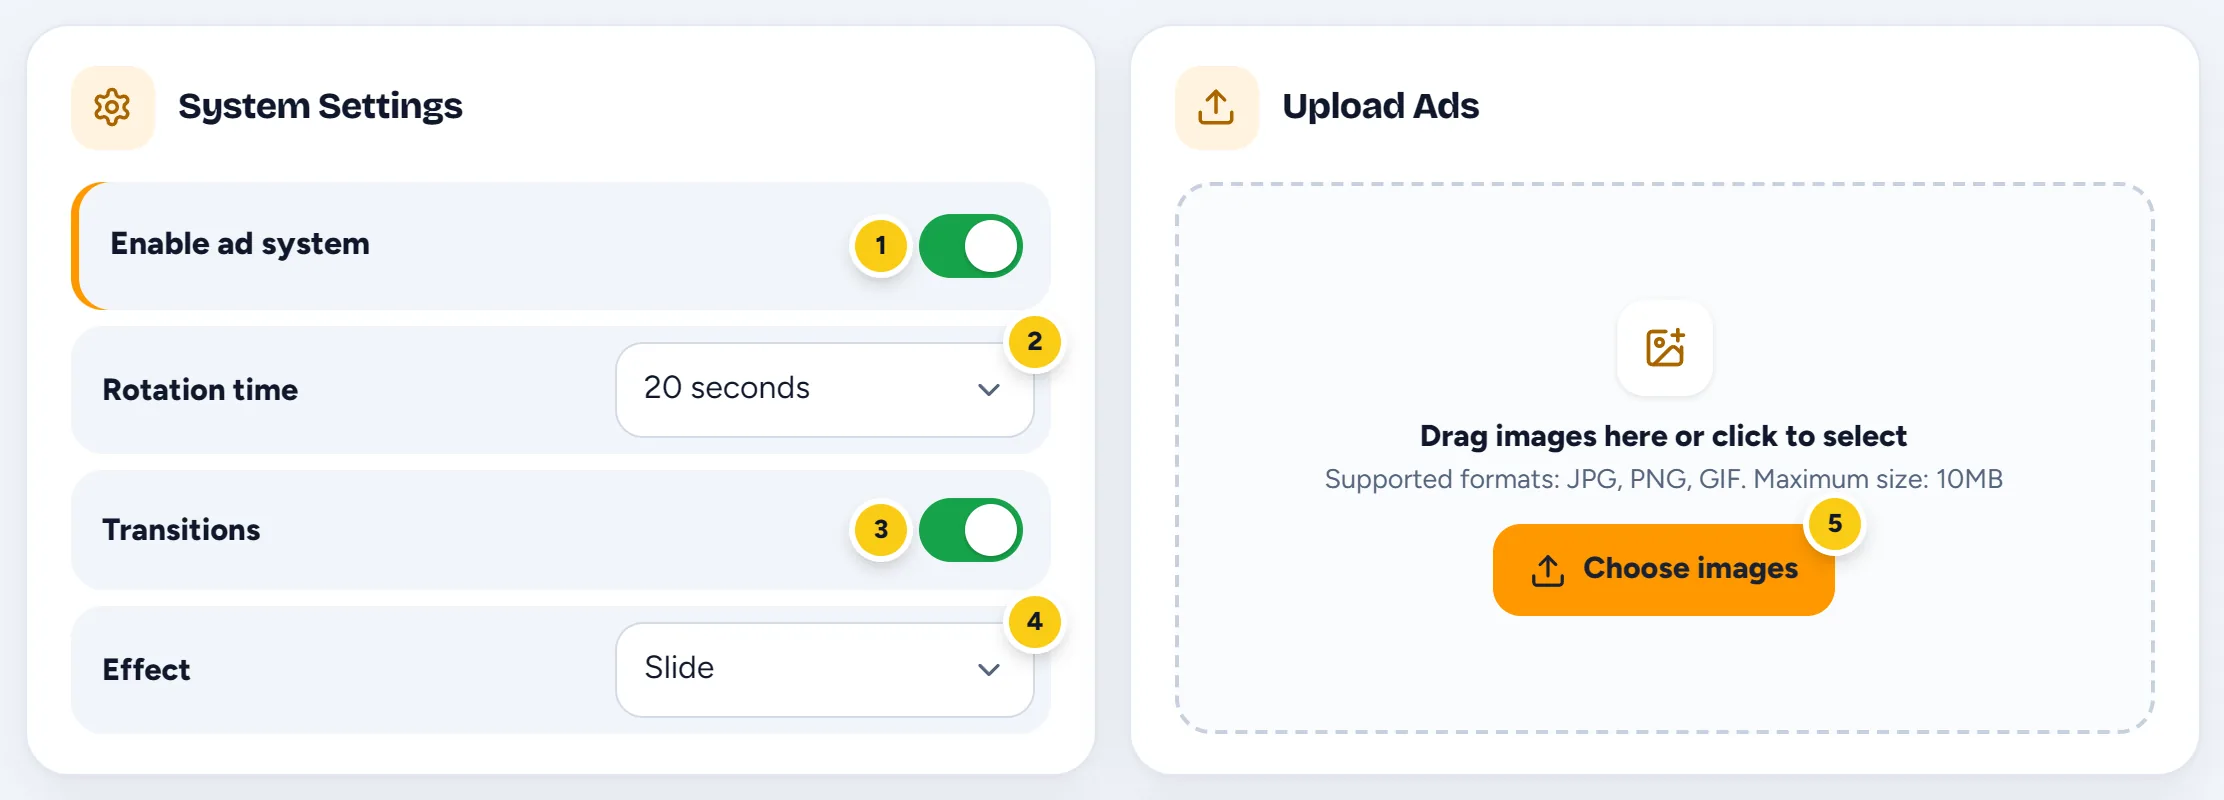
- Enable ad system: when it's off no ad appears and the rest of the screen is hidden.
- Rotation time: 10 to 60 seconds per ad.
- Transitions: moving from one ad to the next with an effect.
- Effect: Fade, Slide, Zoom, Flip, Rotate or Blur.
- Choose images: you can also drag them onto the dotted area.
On this screen everything is saved instantly: there's no save button.
Uploading ads
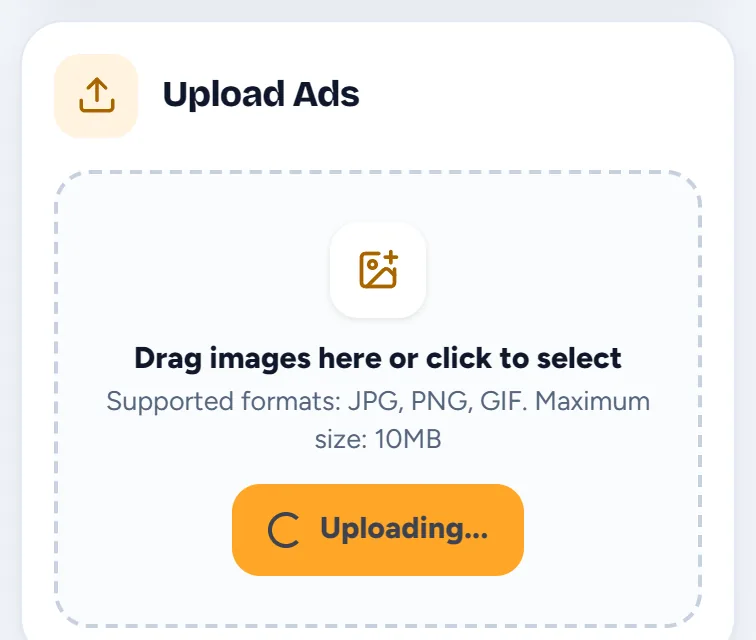
- Press Choose images and pick one or several at once. JPG, PNG and GIF are accepted, 10 MB at most each.
- While they upload, the button says “Uploading...” and won't let you start another batch. Wait for it to finish.
- When it's done, the page reloads and the new ads appear in the list.
Ordering them and choosing where each one shows
Each ad in Configured Ads is a card like this one:
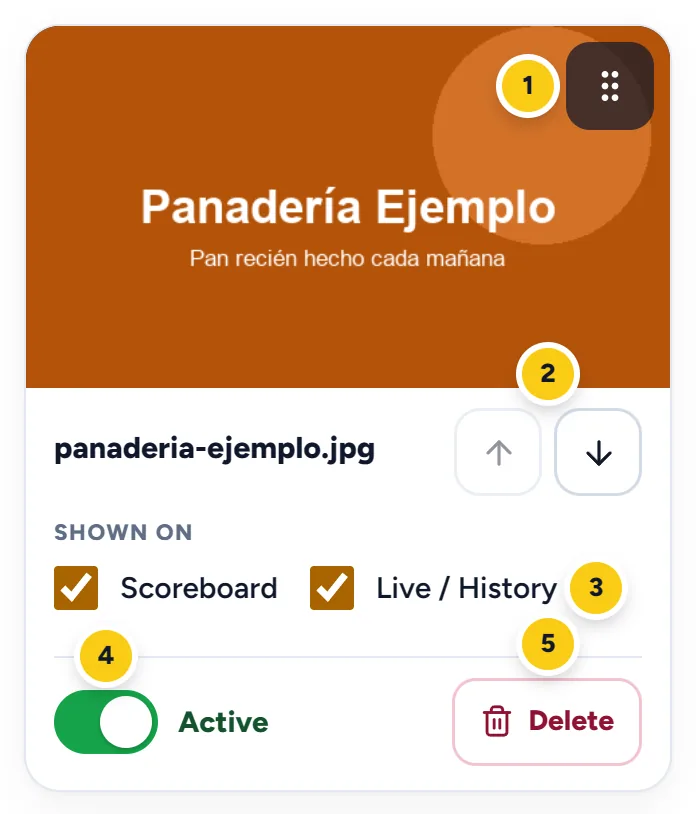
- The handle: drag the ad from here to move it. On a phone, press and hold it for a moment before dragging.
- The arrows: move the ad up or down one place, without dragging.
- Shown on: Scoreboard (the pitch screen) and Live / History (the families' pages). So you can have sponsors just for the pitch, just for the internet, or for both.
- Active or Inactive: takes it out of the rotation without deleting it.
- Delete: shows you the ad and asks for confirmation.
The change didn't reach the server and the card goes back to how it was. Check your connection or sign in again, and try once more.
If you see an ad with the Locked badge, it's always active and can't be deleted.
Use landscape images with the message big and centred: they're seen from far away and for a few seconds. If you have more than three or four, increase the rotation time so they can be read calmly.
14Messages on the screen
From Messages you put a full-screen notice on the pitch scoreboard: a car that needs moving, someone wanted at the club bar, congratulations to a team…
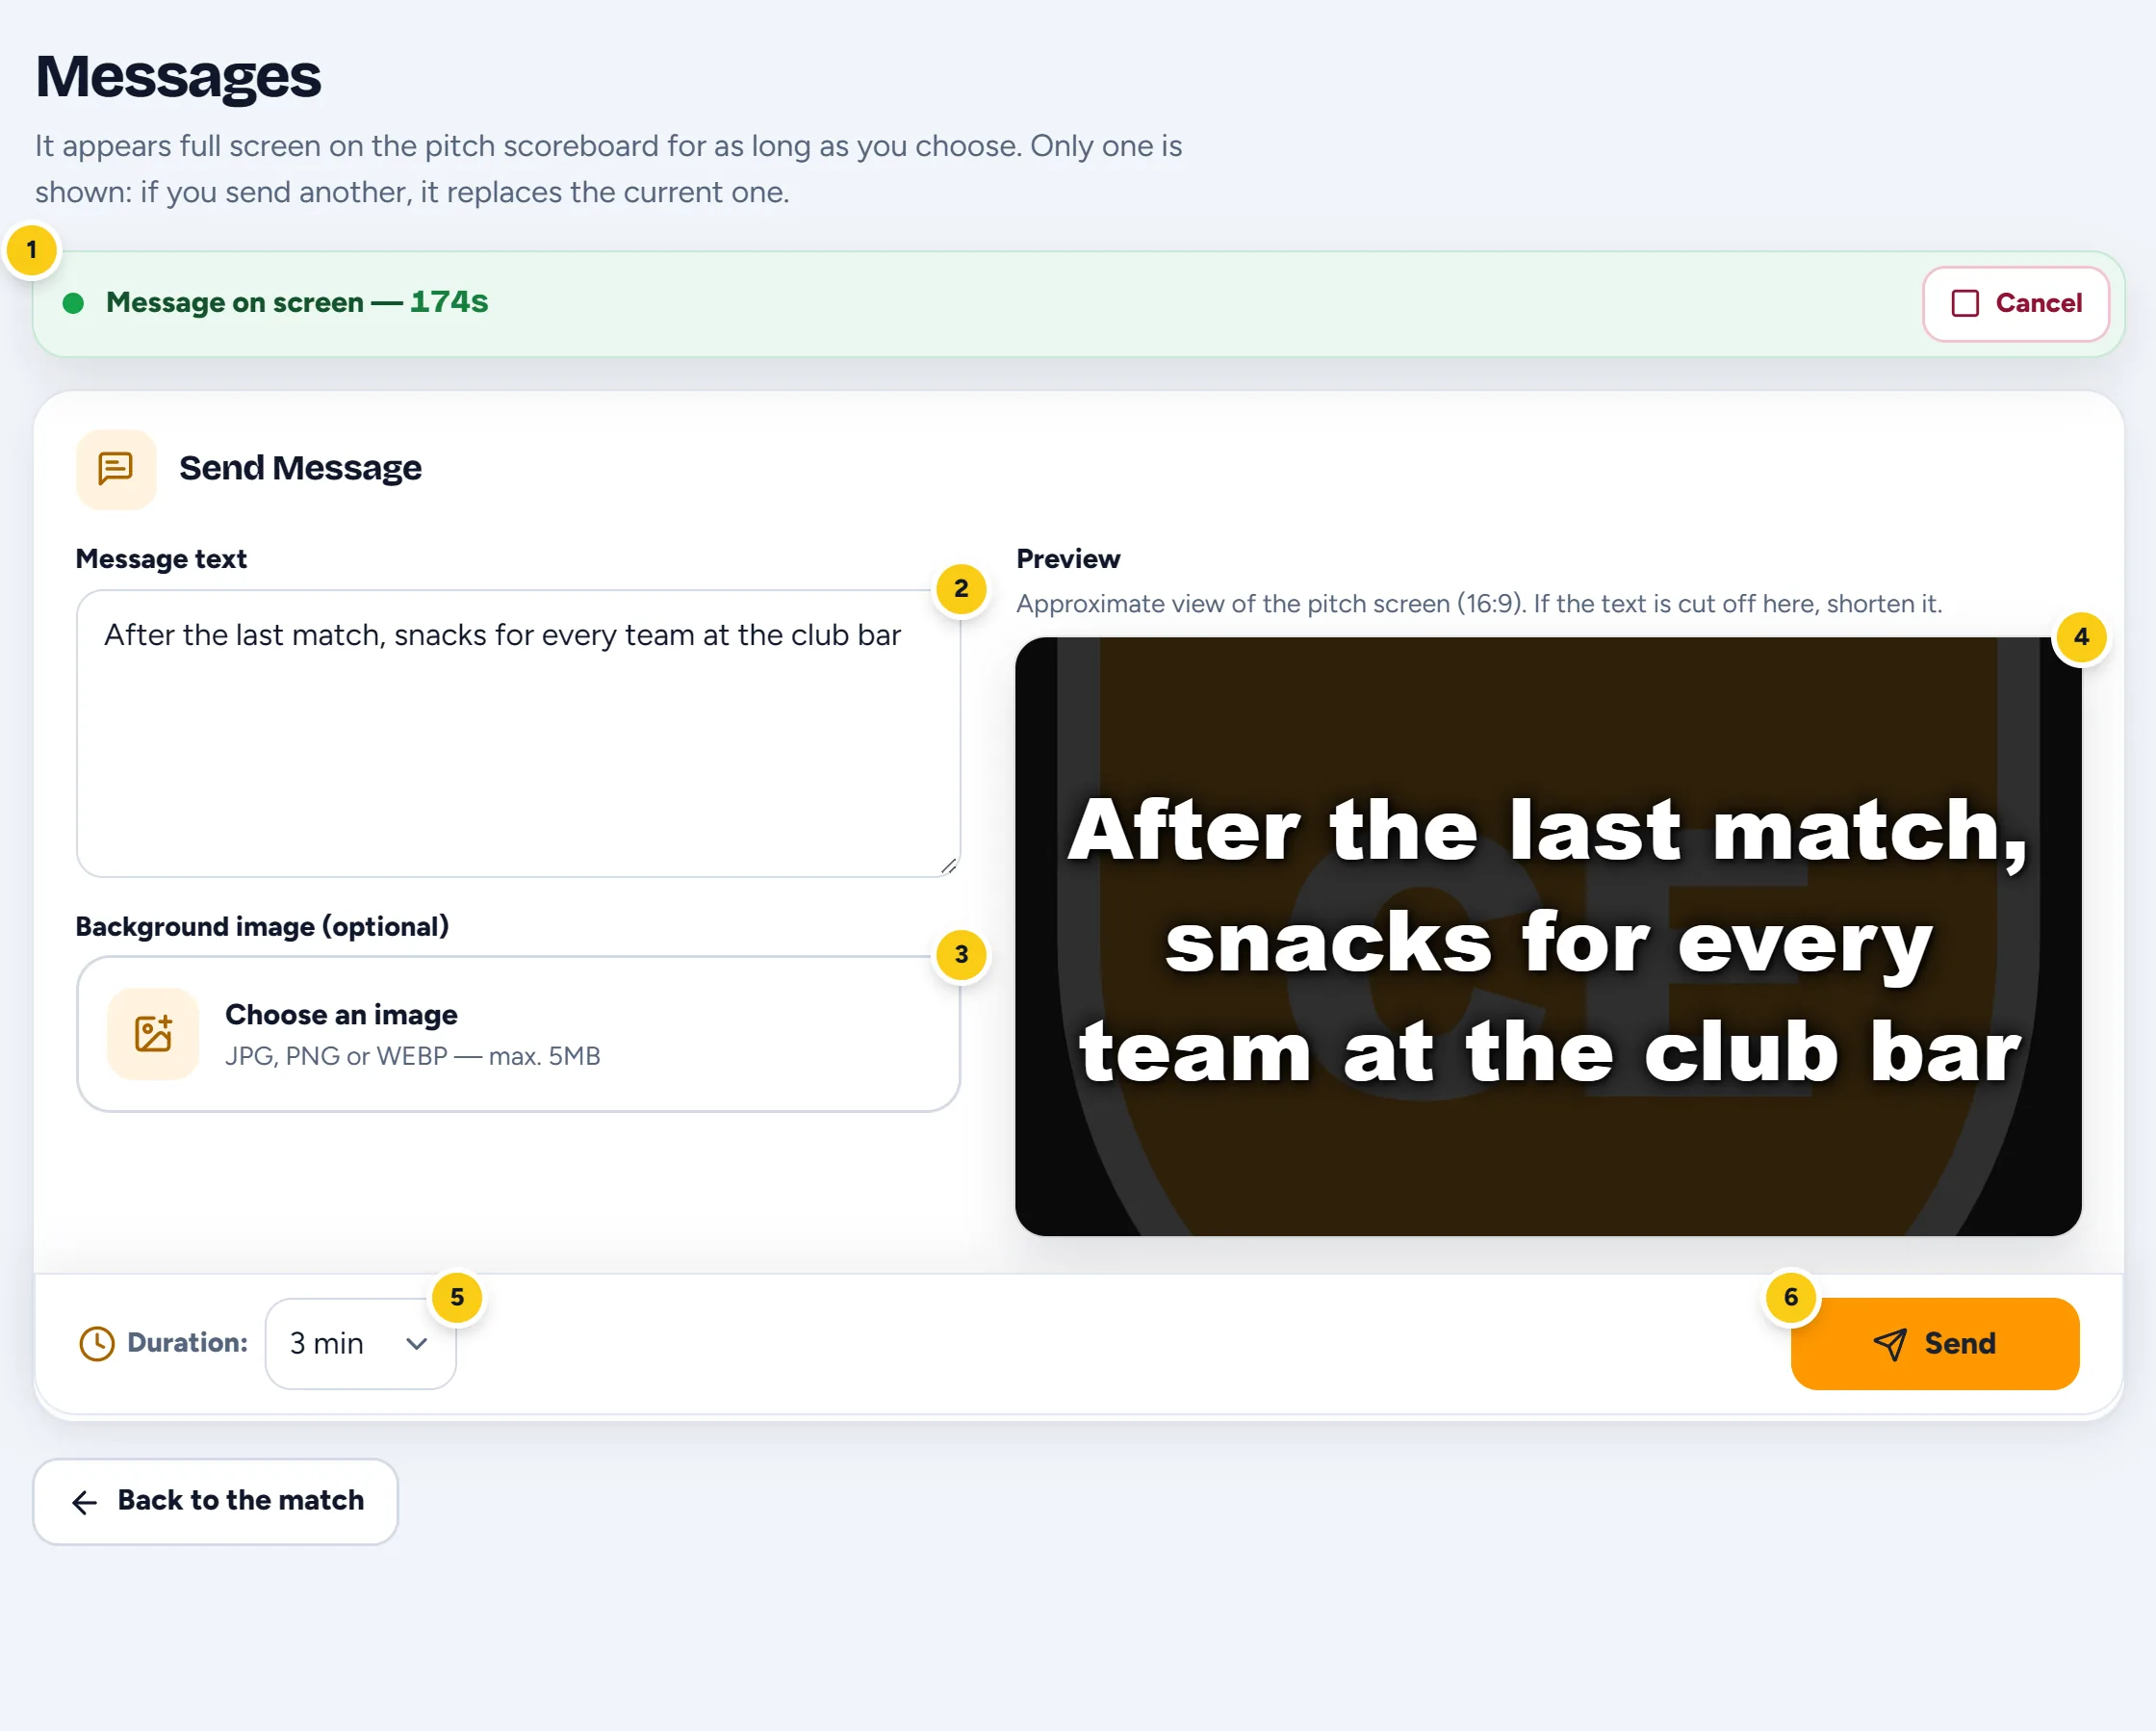
- Message on screen, with the seconds it has left. Cancel removes it early.
- Message text.
- Background image (optional): JPG, PNG or WEBP, 5 MB at most. Without an image, the club logo appears in the background.
- Preview: roughly how it will look on the pitch screen. If the text gets cut off here, shorten it.
- Duration: 1 to 10 minutes.
- Send: it appears on the screen straight away.
Only one message is shown at a time: if you send another, it replaces the current one. When the time is up, it disappears by itself.
That's deliberate: if a goal is scored while a message is on screen, the celebration is skipped so as not to cover the notice. The score is still updated as normal.
15Family consents
This is for keeping in writing whether each family allows, or not, their child's name and photo to be shown on the pitch screen, on the live page, in the results and in phone alerts.
Write to admin@mimarcador.es with the club's contact email and the teams that should appear in the form. Once it's ready, Consents will appear in your menu.
The Consents screen and the families' form are always in Spanish, whatever language the app is set to: the legal text and the consents follow Spanish law. That's why the images in this section are in Spanish.
The link for families
The club has its own address, like mimarcador.es/autorizacion/your-club. It's a public page: nobody has to sign up.
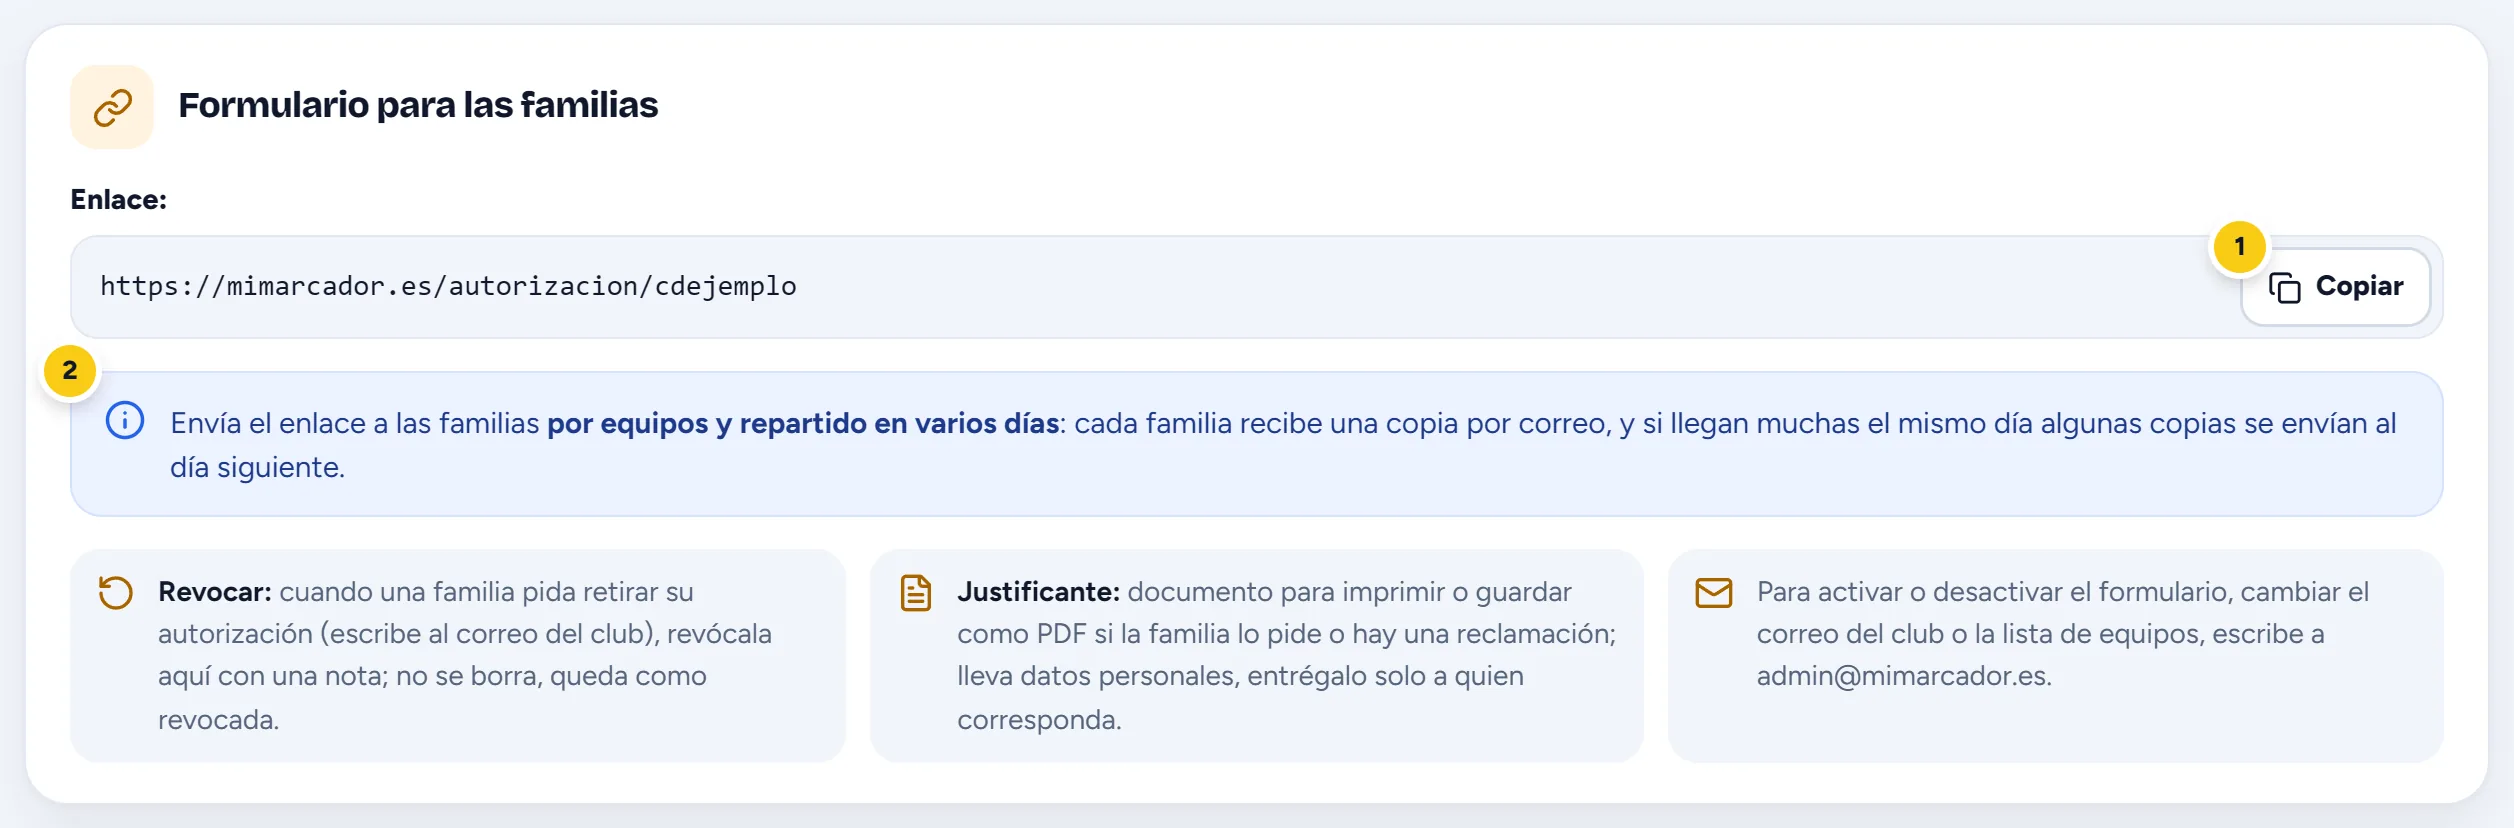
- Copiar (copy): copies the link so you can paste it into the team's group chat.
- The tip for sharing it: team by team and over several days.
Each submission sends a copy to the family by email. If a lot arrive on the same day, some copies go out the next day. Sending the link one team at a time avoids that delay.
What the family sees
They type the player's name, choose their team, say who they are (father, mother, legal guardian, or the player themselves if aged 14 or over) and leave their email. Then they answer two questions separately:
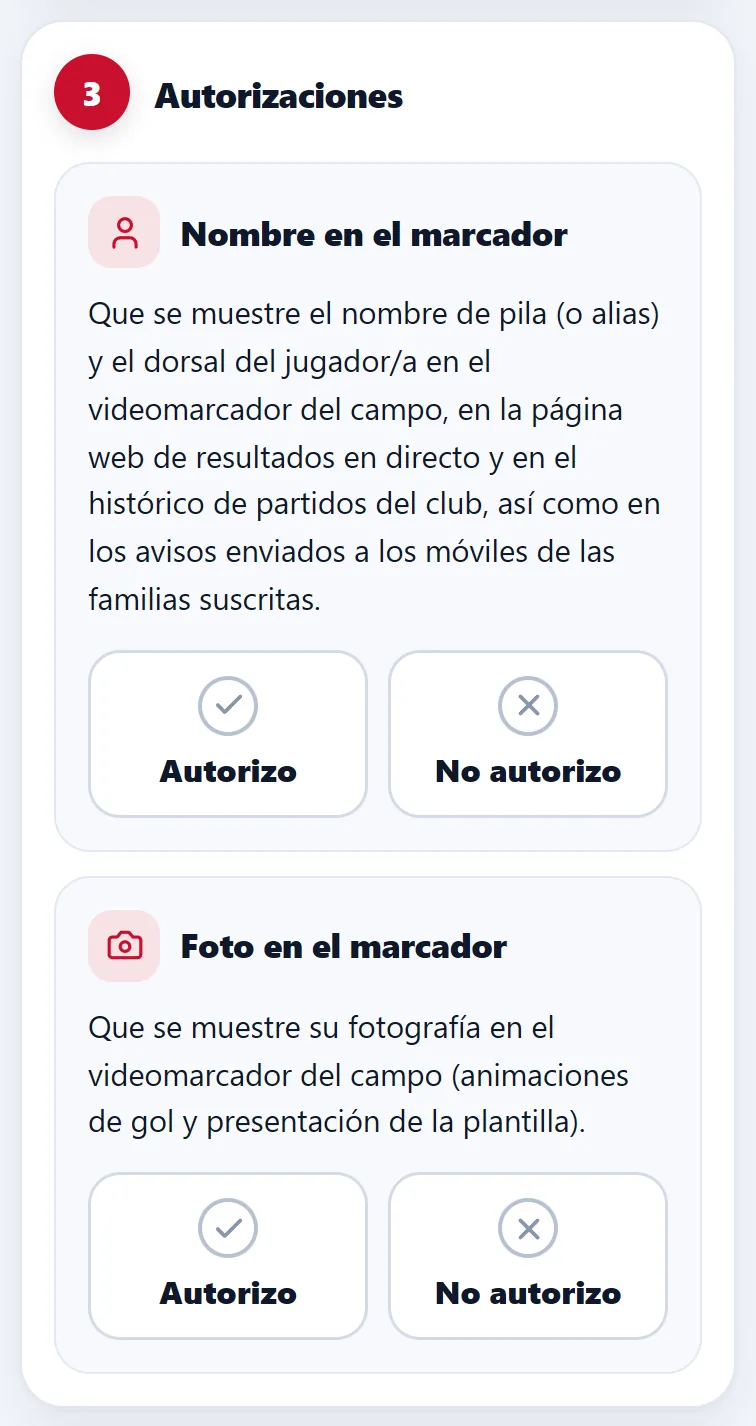
When they send it, the family receives a copy by email. If the player is an adult, they must fill it in themselves. What families see is also explained in their guide.
What you see
In Consents you have the totals, the filters and the full list.
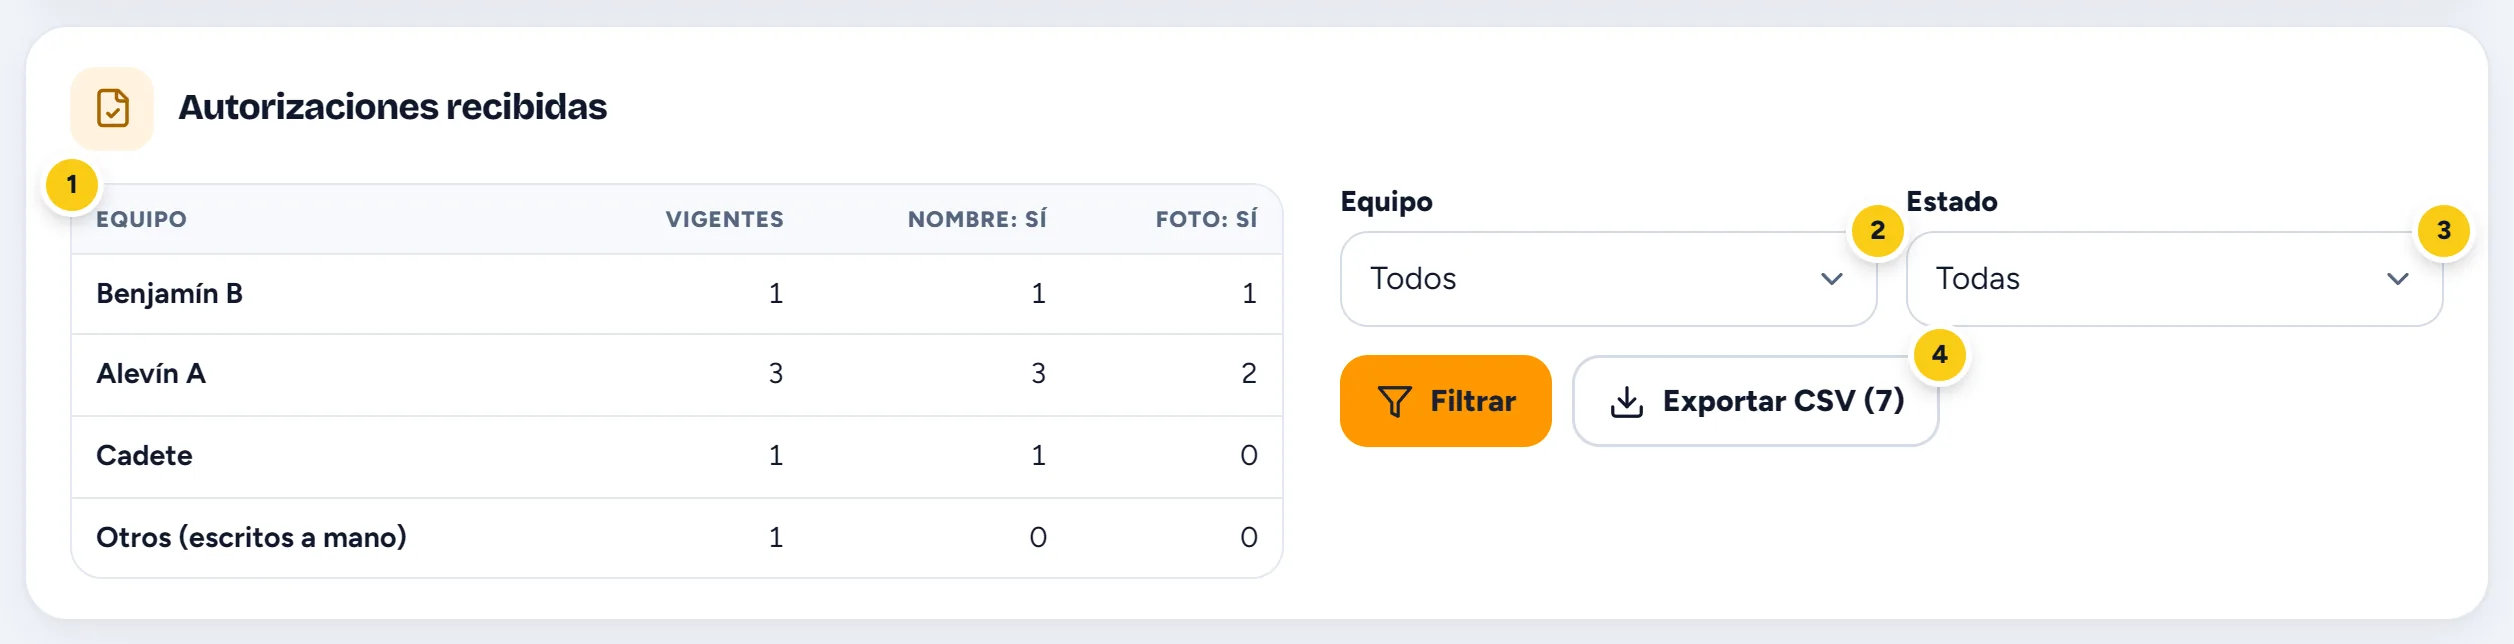
- Totals per team: how many consents are current (Vigentes), how many allow the name (Nombre: sí) and how many the photo (Foto: sí). Otros (escritos a mano) are those that came in with a team that wasn't on the list.
- Equipo (team): filter by one.
- Estado (status): all, current or revoked. Then press Filtrar.
- Exportar CSV: the filtered list, for a spreadsheet. It doesn't include the IP address or the browser.
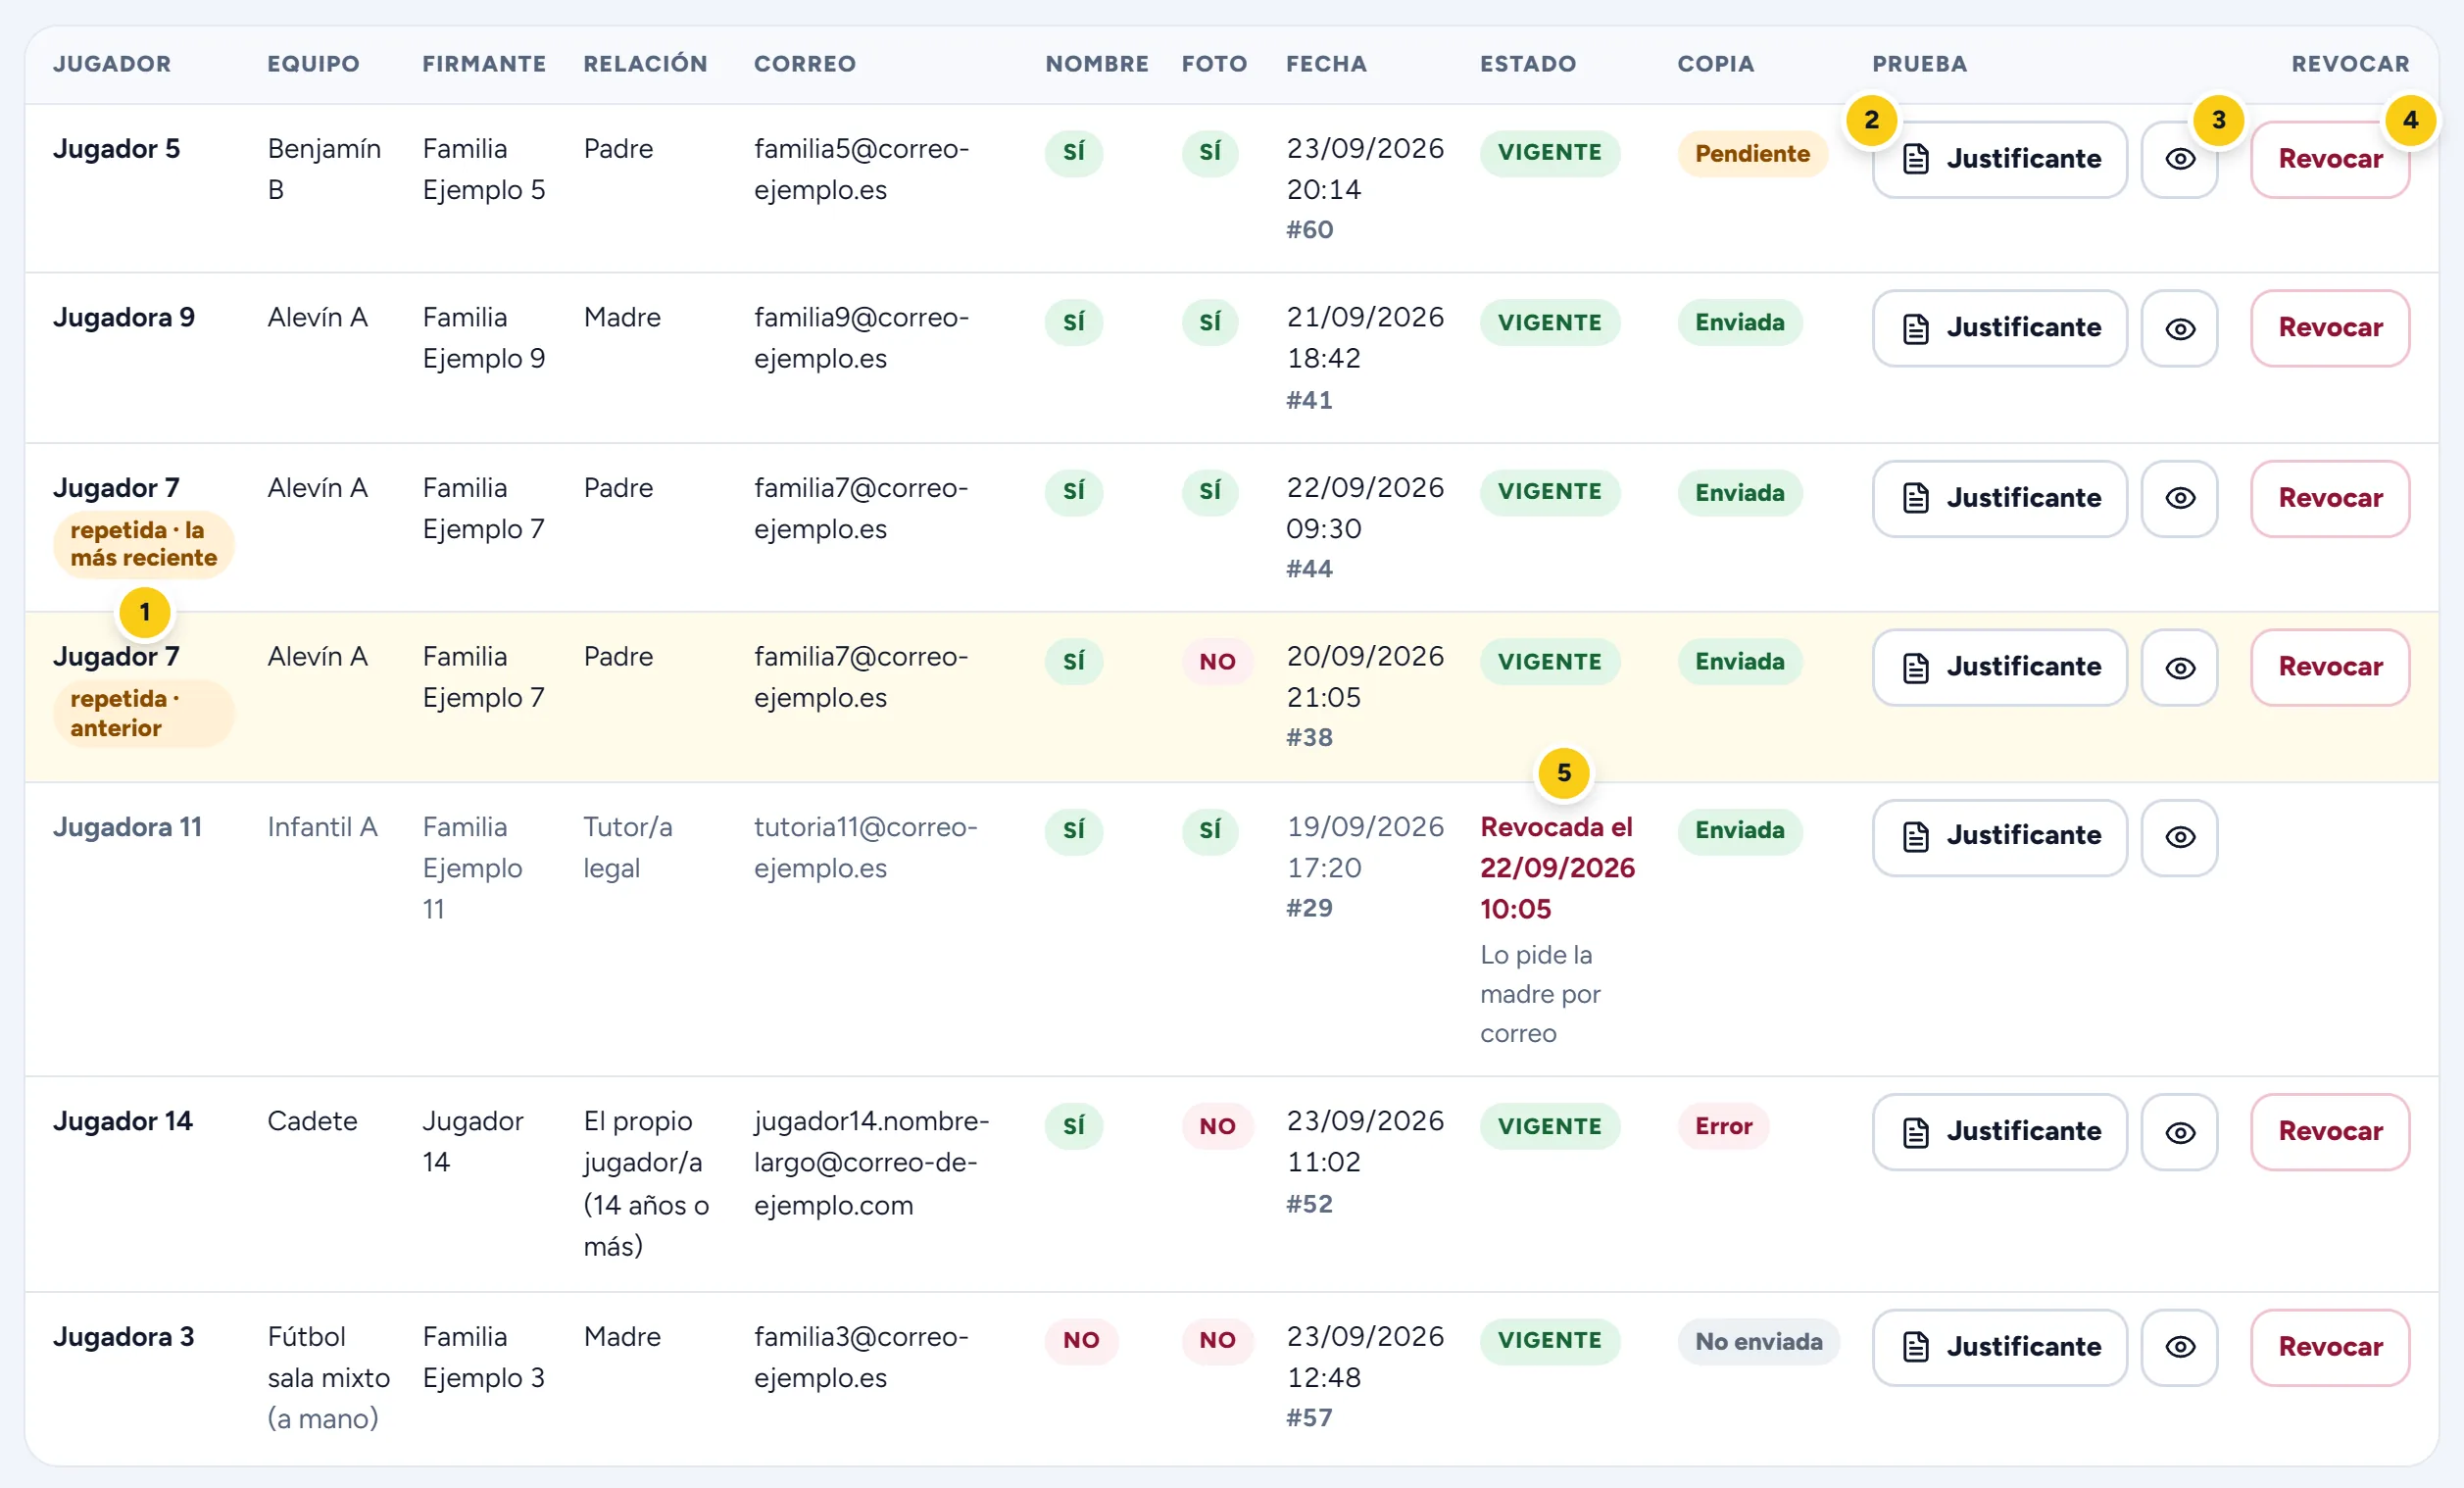
- Repetida (repeated): there are two current consents for the same player in the same team. The most recent one counts.
- Justificante (certificate): the document for that consent, to print or save as PDF if the family asks for it or there's a complaint.
- Ver (the eye): the technical proof: date and time, IP address, browser, the version and fingerprint of the text that was accepted, and whether the copy was sent.
- Revocar (revoke): when a family asks to withdraw their consent. You write a short reason and it's marked as revoked.
- Revocada (revoked), with the date and the reason. It isn't deleted: the record is the proof of what was consented to and when.
The Copia column shows what happened to the email copy: Enviada (sent), Pendiente (it will go out later), Error or No enviada (not sent).
If a family doesn't allow the photo or the name, the screen does not hide it automatically: it's up to you what to do, for example not uploading that photo to the squad or leaving the player without a name. The module is there so you know, and can prove it.
It includes the technical proof and the exact text that was signed. Only hand it to whoever is entitled to it.
Switching it on or off, or changing the club's email or the list of teams, is done by us: write to admin@mimarcador.es.
16If something isn't working
There's an open match on that pitch. Delete it in In progress, or ask whoever is running it to press End Match.
Categories or pitches are missing, or the pitch is inactive. Without both you can't set up a match.
Check three things, in order: the goal animation is on, the player has a photo, and their team has Show photos on in Squads.
You need a team chosen with Show photos on, and to be in the 1st period with the clock stopped at 00:00.
As well as the switch, you have to upload that card's image and tick the match's category.
The Enable Squads switch, at the end of Animations, is off.
Check the main switch, that each ad is Active and has Scoreboard ticked. And remember: they only show when no clock is running.
In Scoreboard and Animations you have to press the save button: if you see “You have unsaved changes”, it isn't saved yet. See How Settings works.
That user isn't an administrator. Change it with the Admin switch in Users.
Reload the pitch screen with a forced reload (Ctrl+F5) and check it's connected.
Each person has to turn them on on their own phone (guide for families). If it doesn't work for anyone, tell the super administrator.
Search for it in Crests and, if it isn't there, press Request this crest.
Write to admin@mimarcador.es saying what you've set up and what you see. If you can, attach a screenshot.